

We all know and love the Fujifilm film simulations. With the touch of a button, you can apply some wonderful looks to your photos. But which Fujifilm film simulation performs best in low light with high ISO values? Which ones perform the worst?
For fun, I informally tested all the film sims on an X-T4. The results surprised me.
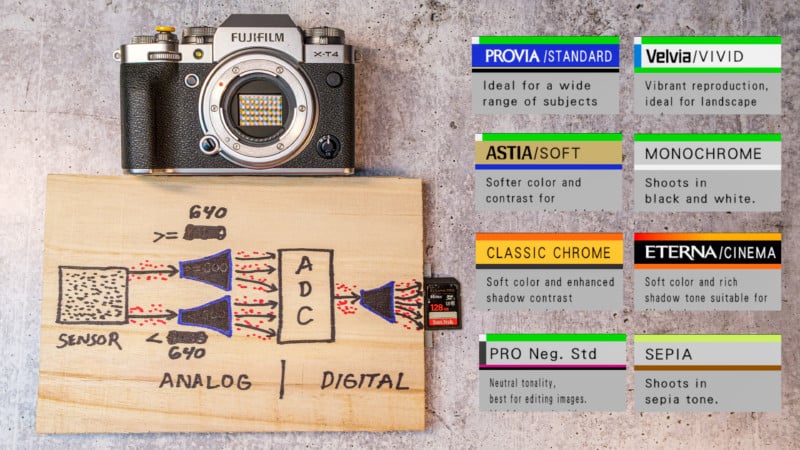
For those of you new to Fujifilm or to photography in general, whenever you increase the camera’s ISO value, you are amplifying the electrical charge from light photons that hit your camera’s sensor. If you are taking photos in low light conditions, increasing the ISO is one of three exposure triangle settings you can make that allows you to capture more light in your image.
For this test, I used only the straight out of camera JPEGs. The reason is that the image quality on the RAW files is heavily dependant on whatever post-production RAW software you are using (e.g., Lightroom, Capture One, etc).
I shot with an X-T4, using the 35mm f/2 lens with identical lighting conditions and settings for each shot. I also zeroed out the additional in-camera image quality settings such as sharpness, clarity, and so forth. I wanted to see results based on the default camera settings. Obviously, if I had set Noise Reduction to +2 or Sharpness to -3 that would have affected the noise. Again, I just wanted to try the test with a zero value for all the menu IQ settings.
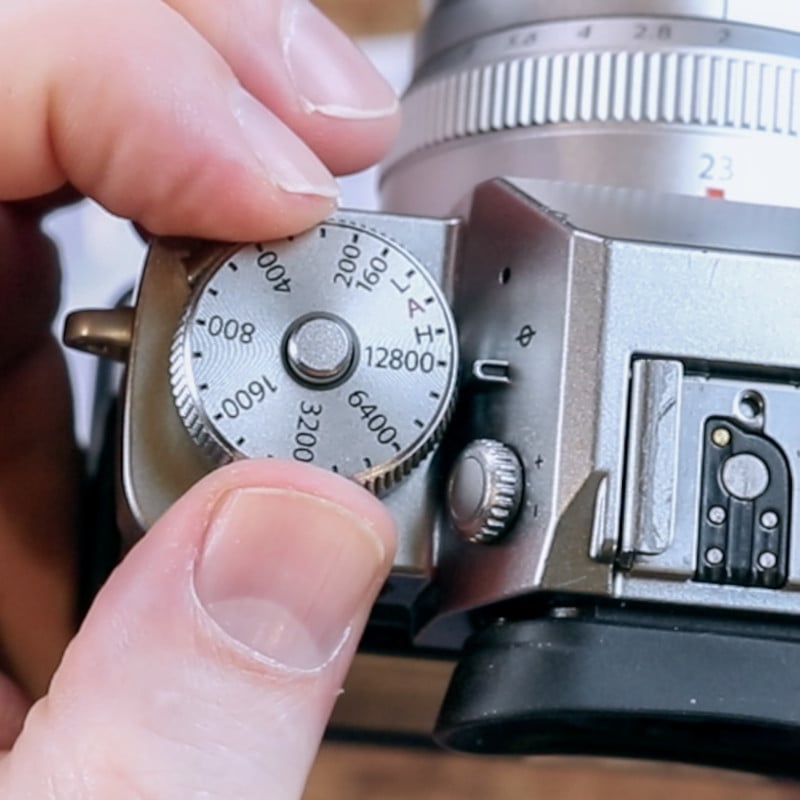
I tested each of the 12 main film simulations at the following ISO values: 1600, 3200, 6400, and 12800. Those are all native ISO values for the camera. In addition, I tested two additional ISO values of 25,600 and 51,200. Those are called ‘extended’ or ‘simulated’ ISO values. And they are applied digitally to your already shot image just before your camera saves the file to the SD card.
My Results
For a more in-depth look at the images, process, etc. be sure to see the entire video above. Below are some screenshots and some data that briefly summarizes what I was able to find.
Below 1600
- All film sims are identical. ACROS purposely has additional grain applied as part of the ‘look’.
ISO 1600
- All film sims mostly identical. You have to pixel peep at 300% to see much difference.
- Lowest noise: PROVIA, Pro Negative Standard, and Monochrome.
- Highest noise: ACROS and Bleach Bypass
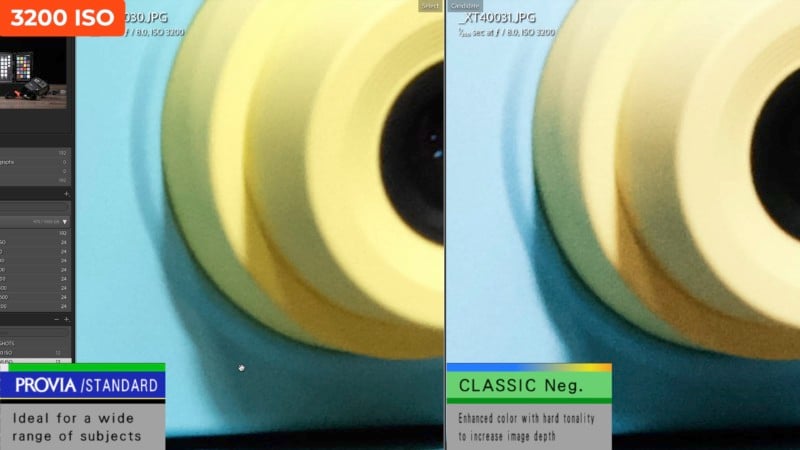
ISO 3200
- You can see differences zoomed in at 200%.
- Lowest noise: PROVIA, Pro Negative Standard, and Monochrome.
- Highest noise: Classic Negative, ACROS, and Bleach Bypass
ISO 6400
- You can now see differences at 100%.
- Lowest noise: Pro Negative Standard and Monochrome.
- Highest noise: ACROS and Bleach Bypass
- NOTE: At this level, I also started to see that PROVIA held more noise than Pro Negative Standard
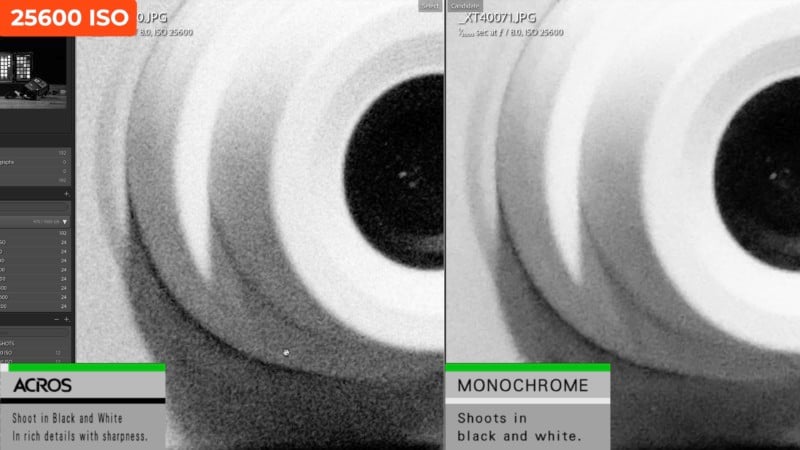
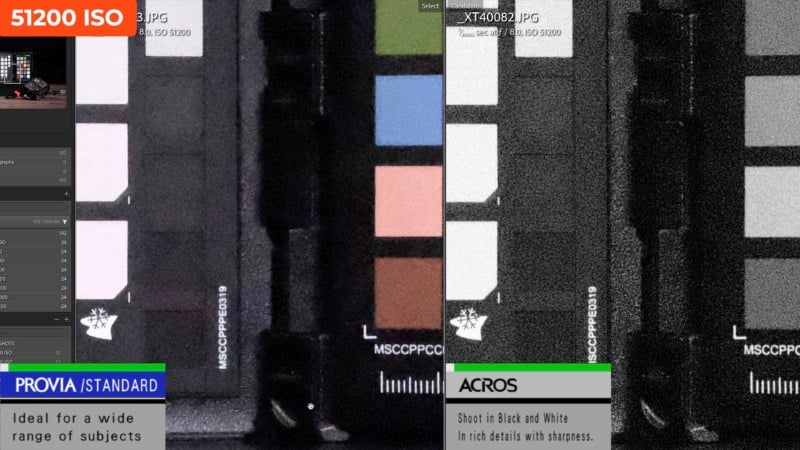
ISO 25,600 and 51,200
- Lowest noise: Pro Negative Standard and Monochrome.
- Highest noise: ACROS and Bleach Bypass
Conclusions
- Monochrome is much less noisy than ACROS at all higher ISO ranges. In going through my testing, it seems pretty conclusive that Fujifilm adds some additional grain and/or noise to ACROS to help give it that unique look. The problem is, at much higher ISO values, it can start to fall apart at bit. If you are planning on shooting with ACROS, I would not go above 3200 ISO. Also, I’d definitely make sure the grain setting on your camera is turned off.
- PROVIA, VELVIA, ASTIA, ETERNA, Pro Negative High and Sepia all performed well and had roughly the same good performance at higher ISO values. Of this group, PROVIA was the overall winner when you start pixel peeping at 300% or above.
- If you are shooting at ISO 3200 and above, I would avoid Bleach Bypass, ACROS, and Classic Negative. Once you go above ISO 6400, I would not use any of those three film sims if I wanted to keep my noise to a minimum.
- Most interesting of all were the winners. And they were Pro Negative Standard and ETERNA. If you are planning on shooting in low light at very high ISO values, you may want to give them a try. Both Pro Negative Standard and ETERNA gave me the overall best and consistent results.
Remember that everything I mentioned above has to do with the straight-out-of-camera JPEG images, which have the film simulations already “baked” into the file. Obviously, if you are shooting in RAW, you will have much more flexibility and your results are more dependant on your demosaicing post-production software.
This was a fun test to try and video to put together. It’s very interesting to look at how Fuji film simulations handle higher ISO ranges. That being said, remember that ISO does not actually create noise, it merely amplifies the noise that’s already in your image. If you want to reduce noise in your images, don’t necessarily always default to raising the ISO. Rather, increase the exposure whenever you possibly can by adding more light or altering your shutter speed and/or aperture.
Happy shooting!
About the author: Chris Lee is a photographer, technical trainer, and video editor located in the Atlanta area who manages the pal2tech YouTube channel. He recently woke up one morning and realized that he loves teaching photography even more than actually taking photos. We know… he still finds that hard to believe also.
Author: Chris Lee
Source: Petapixel
