

I’m Colin Smith from PhotoshopCAFE.com. In this 4-minute video and article, I’ll share a new Photoshop technique I came up with that gives you separate control over strength, color, and luminosity in LUTS. I call this the Split LUT technique.
We all love LUTs (lookup tables). They are a quick and portable way to apply color and tonal presets across platforms and different applications. We call these presets looks. This started in video and has now become popular in photography as well.
The problem with LUTs is the lack of flexibility. You can’t adjust different parameters. You can only adjust the opacity or strength of the LUT. Sometimes, the color is perfect, but the tone is too dark or bright. Inversely, sometimes the tones are spot on, but the colors aren’t what we like.
This is what got my thinking about a way to separate a LUT (or split it) into separate tone and color. I’m going to show you how I accomplish this right now, and it also works on other applications, not just Photoshop. This is like frequency separation, but instead of splitting into color and texture, we are splitting into color and luminosity.
The solution is actually really simple — so simple, most people wouldn’t even think about it. We will use Layer blending modes.
With the image in Photoshop apply a LUT using a Color Lookup Adjustment layer.
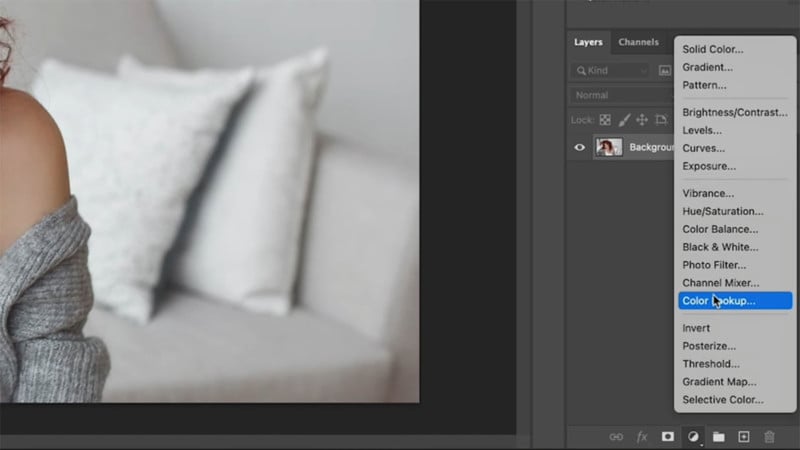
If you want to modify it, you can only adjust the opacity. This is where the trick comes in.
Duplicate the adjustment layer. You should now have 2 adjustment layers, and the effect of the LUT is doubled on the image, but not for long.

Change the name of the top Layer to Tone or Luminosity. Change the Blending mode to Luminosity.
Rename the bottom adjustment layer to Color. Change the Blend mode to Color.
Now, if you adjust the opacity of the color layer, you can control the color of the LUT. If you change the opacity of the tone Layer, you can adjust the luminosity.
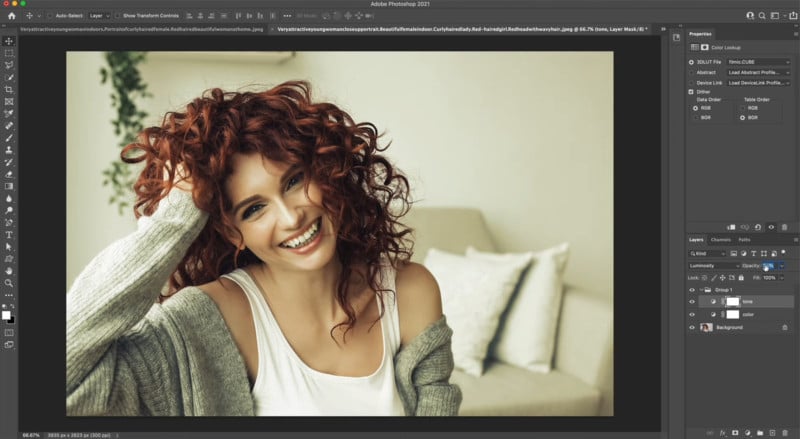
You could even use a different LUT for tone and color.
I told you it is easy, but it’s very powerful. Be sure to watch the short 4-minute video above to see this in action and grab a couple of extra tips.
If you enjoyed this technique and tutorial, be sure to subscribe to the photoshopCAFE YouTube channel for more content like it.
About the author: Colin Smith is a visual creative and content creator who founded photoshopCAFE, which offers Photoshop tutorials and tech reviews. The opinions expressed in this article are solely those of the author. You can find more of Smith’s work on his website, Facebook, Twitter, Instagram, and YouTube.
Author: Colin Smith
Source: Petapixel
