

One of my favorite techniques in photography is shooting panoramas with a telephoto lens. I got asked a lot about this technique, so I decided to create a full video and article in which I’ll go through the entire process.
This tutorial will cover how to set up your gear, what you can and what you can’t do in the field, the capturing technique, composition, camera settings, and the overall post-processing workflow I used in Lightroom.
Landscape Photos with a Telephoto Lens
During my recent winter workshop in Iceland, I spent an entire morning shooting the insanely beautiful Vestrahorn, an incredible mountain in the very popular Stokksnes peninsula in the southeast of the island.
I already photographed this location many times, but for this session, I wanted to photograph it from a different perspective, rather than from down to the beach or using the lovely dunes as the foreground.
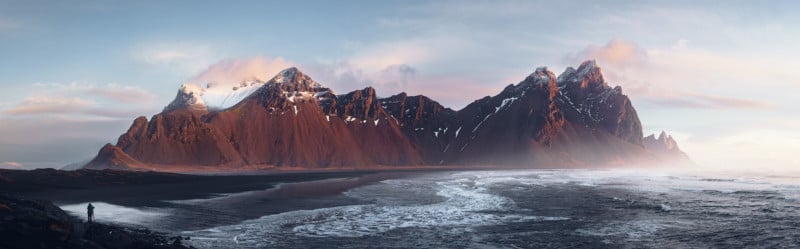
I decided to create a big panorama image combining multiple images using my Fujifilm 50-140mm.
Just for reference, during the trip, I shot almost 80% of my images with a telephoto focal length. This should give you an idea of how important a telephoto lens is if you plan to visit Iceland for the first time (or maybe it’s just my personal telephoto addiction!).
I decided to use the telephoto end rather than the wide-angle end for a few reasons.
With a wide-angle lens, we have definitely a wider angle of view. However, the wide-angle lens tends to exaggerate the distance between you and the objects. And that’s absolutely great if you have a strong foreground that leads you to the background. But for the composition I had in mind, the point of interest was very far away.
I would also say that the primary reason to capture a composite panorama rather than a single wide-angle photo would be to produce an image of higher resolution.
So, composition-wise, from the position I chose it would have been impossible to fill the frame with the mountain and have a great balance with the sea.

And here is where the telephoto focal length comes into play. It has different advantages over the wide-angle:
1. Telephoto has a narrower angle of view. We can get “closer” to the subject and concentrate our attention much more on it. But, there is a caveat. The limitation is that we can’t get the entire scene in one single frame. And that’s basically why we need to shoot multiple images and stitch them together to have a full real estate representation of the location.
2. Another great benefit of using telephoto is that I can easily switch from horizontal to vertical compositions taking advantage of the lens collar. That’s very handy when you need to decide how to frame and execute the panorama.
3. And another advantage is telephoto has much less distortion (especially towards the edges) and you don’t have the parallax effect that you get with the wide-angle lens. So it’s much easier to stitch multiple images together in Lightroom.
The Technique
Let’s talk about the basics and the shooting steps for the correct execution.
Let’s start with the gear. I recommend using a sturdy tripod and leveling it to keep your series of images level. To level the tripod you can use the built-in bubble level (if your tripod has one), and adjust the legs so the level’s bubble is centered. Of course, you need to have a tripod head with pano control to pan.
That isn’t to say nice panoramas can’t be done handheld. I have shot many handheld panoramas with wonderful results; but the images shot that way sometimes might be harder to stitch together, though stitching software is getting better and better.
Then, you also need to level the camera side to side, and I usually use my in-camera electronic level. It’s a very handy function.
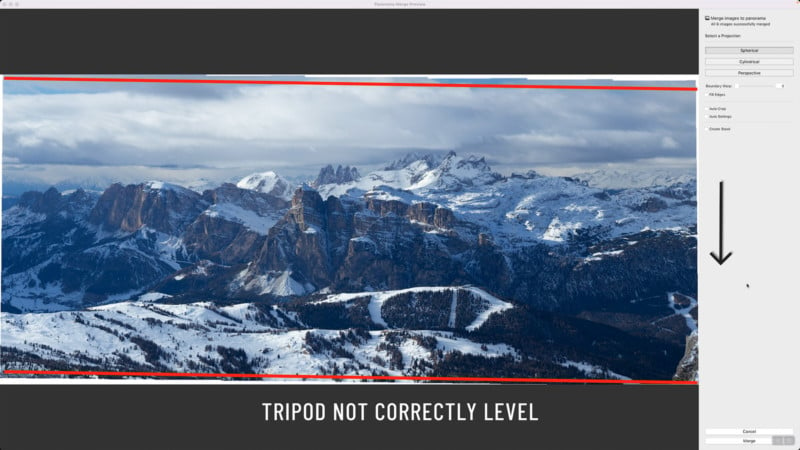
If you don’t level the tripod and camera, the series of images will surely slope downward on one side or the other. Your goal is to make your images as level as possible across the entire series to optimize the details collected.
Let’s take a look at other important settings and aspects we need to take care of. The main thing when shooting a pano is to lock down all the camera settings, so the camera won’t be making any adjustments on its own. So, what does that mean?
Here are my 10 recommended steps for nailing your settings:
Step 1. White Balance
Never use the auto white balance for images intended for a panorama. You don’t want the camera to change the white balance between images, and it will happen if the scene colors radically change from one side to the other. Of course, shooting in RAW, you can correct it later on in Lightroom, but I always prefer to get a consistent result throughout the entire sequence right in camera.
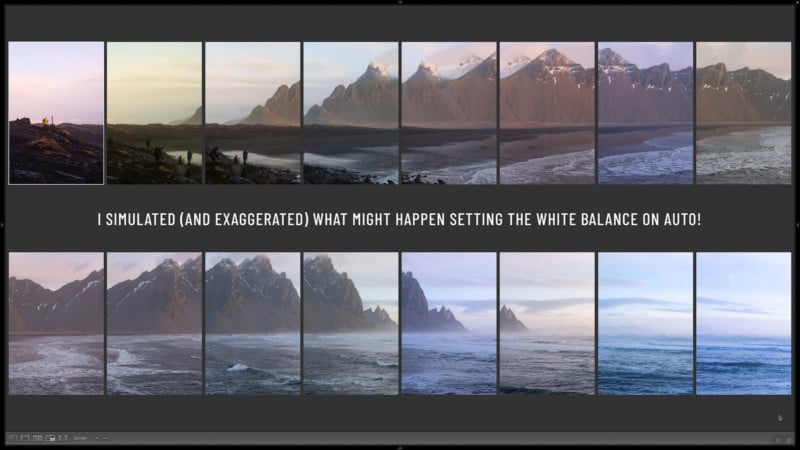
So, always use a preset white balance, or, if you like, use the K option to enter a specific color temperature choice. As my personal preference, I always set up the white balance to “Daylight”, and forget it.
Step 2. Focus
It’s very important that the camera doesn’t change focus between the shots of a panorama series. My recommendation is to use the manual focus and keep your paws off the lens’s focusing ring. In this case, I manually focused on the mountain using the peak focusing highlights function, making sure to have the entire scene in focus front to back.
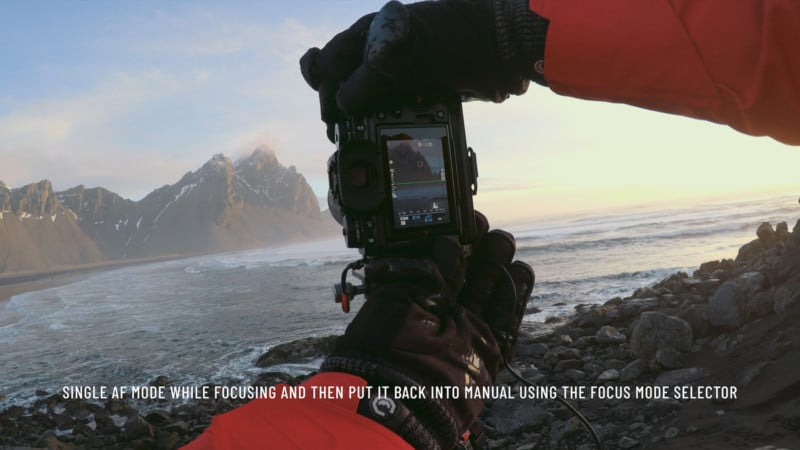
You can use the autofocus mode just to focus one time and then put it back into manual, and continue shooting the rest of the exposures.
Step 3. Don’t Zoom the Lens
Don’t change the focal length between the images of a single panorama. Changing a zoom setting would cause the same object in adjacent images to be different sizes, and the stitching software would be unable to properly align the images.
I selected a focal length of 50mm, which is a 75mm full-frame equivalent. Be careful with longer lenses, such as, for example, 300mm. The magnification of longer focal lengths causes limited depths of field, which can cause noticeable changes to foreground focus between the images of a series.
Step 4. ISO
Always use the same setting for all of the images shot for the panorama. For this shot, I selected ISO160 (the lowest native Fuji ISO) to get the cleanest image quality. If you find yourself shooting in windy conditions, you might have some camera shake, so I highly recommend choosing an ISO value that guarantees you the proper shutter speed to avoid any blurred image.
Be aware, though, that just one blurred image in the sequence will completely screw up the final pano image.
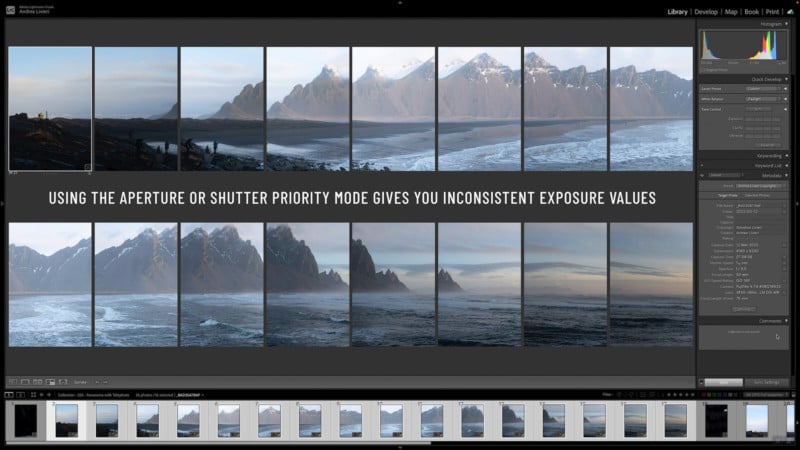
Step 5. Aperture and Shutter Speed
Use manual exposure so that the exposure remains the same for all of the images of a single panorama. Any change to either aperture or shutter speed between the images would make it difficult to match when the images are stitched together.
For the shot, I used a shutter speed of 1/40sec. that was enough to get pin-sharp shots since there was just a gentle breeze coming from the sea.
I always use the cable release to avoid shaking the camera. As an alternative, you can use the 2-second timer if you will.
In terms of aperture, I selected the diaphragm f/8 which was perfect to guarantee a great depth of field front to back and excellent image quality performance of the lens.
Telephoto lenses have a shallower depth of field than wide-angle lenses, so at a given aperture the sharpness is not going to be as wide throughout the frame with telephoto as it would be with the wide-angle. However, in landscape photography, you’re not going to have a noticeable foreground when shooting telephoto; everything you’re shooting is going to be far away. So, that issue is no longer an issue. And an aperture between f/8 and f/16 usually provides excellent sharpness throughout.
Step 6. Exposing the Images
As just mentioned, to expose the scene, always use manual exposure and your histogram. First, point the camera at the brightest area to be included in the panoramic image, and adjust the shutter speed so the important highlights are well exposed. This means that the right side of the histogram data approaches as closely as possible, but doesn’t actually touch, the right edge of the graph.
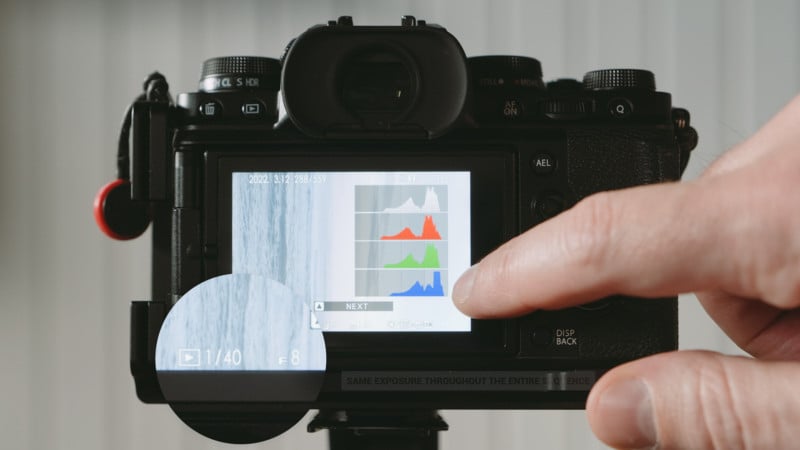
Use that exposure for the entire series, and take care that the prevailing light doesn’t change during the series. If it does change, you must re-shoot the entire series so that every image is shot under the very same light.
Step 7. Image Stabilization
I tend to always switch off any image stabilization features on the lens or within the camera body. The image stabilization can actually introduce a camera shake if left on when your camera is mounted on a tripod, and especially when using a telephoto lens, those movements will be exaggerated and result in a softer image.
Step 8. Orientation
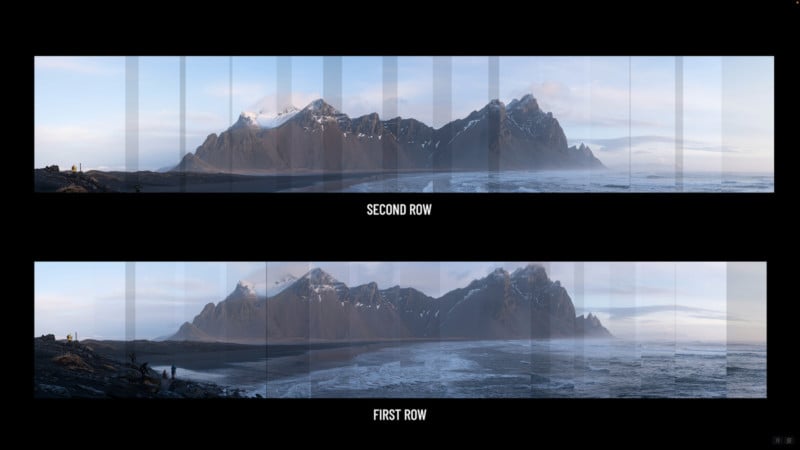
In terms of orientation, for this specific scene, I chose the vertical orientation that’s enabled me to include all the information I needed. The entire panorama consists of two-row, one to include more of the sea and another one to bring in more sky.
Shooting vertical images capture more space above and below the subject, so there is less chance of accidentally cropping part of the scene. When the images are stitched together, you can use the crop tool to eliminate unwanted elements at the top or bottom of the image, assuming none of your main subjects is too close to the edge.
Step 9. Panning Direction
For some reason, I captured the sequence starting from the right side, so, from where I metered the exposure. But, I suggest making your first shot on the left side of the scene, which simplifies lining up your images properly in the filmstrip in Lightroom. It doesn’t make any difference in the final result, it’s just to keep things in order.
Step 10. Overlap the Images
As you shoot the series of images, as a general rule of thumb make sure each image overlaps the previous one by about 30% or more. The software requires having identical objects in adjacent images to line them up precisely. So, as you’re moving around, you’re gonna make sure that you only move about 2 thirds through the next shot before you take another image.
This rule is really just for mid-range lenses, something like 35mm, 50mm, or above, like in this case. If you’re shooting with a wide-angle lens, you need to take more images with greater overlap. But, this is something we can discuss in another future video.
Stitching the Panorama in Lightroom
Here we are in Lightroom and here we’ve got the entire sequence of images. Two rows, for a total of 30 images.
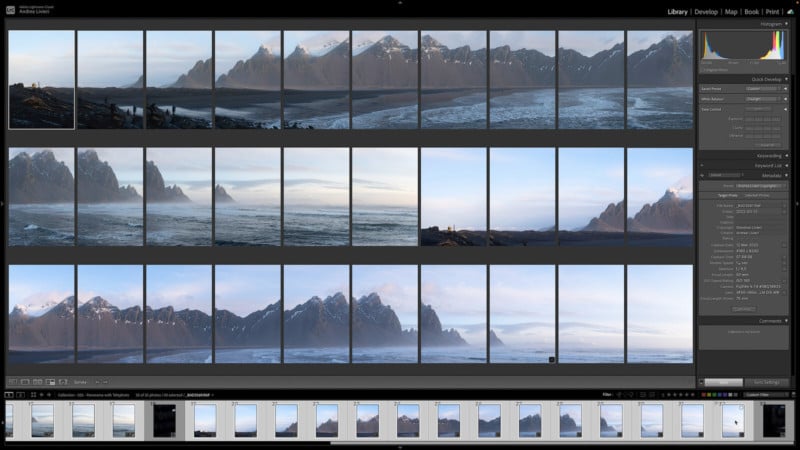
Stitching software-wise, I generally use Lightroom and its Panorama Photo Merge function because this method preserves the raw file data and provides you with full control over the tones.
The resulting image is a huge 256-megapixel resolution monster with a DNG file size of 821 megabytes, so it’s a massive amount of information!

The editing of this image is quite simple, however, I applied several local adjustments to the image to make the panorama pop and a few global adjustments to set the foundations.
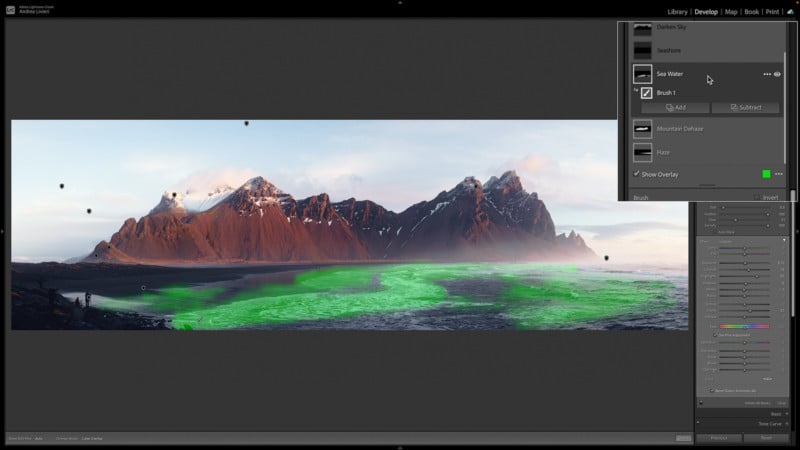
You’re welcome to watch the 20-minute video at the top to learn more about every single adjustment I made and the full workflow from stitching the images together to the final product ready to be exported.
In Conclusion
I hope you found the tutorial useful and now I’d love to know how you take panoramas. I love the telephoto lens, and I think that using it for landscape can really expand your horizons. So, get out there, experiment with your telephoto lens, and have fun.
P.S. If you like my photography and you’re interested in joining me in one of my photography workshops, please check out my website.
About the author: Andrea Livieri is a Venice-based professional photographer, educator, musician, and spirited adventurer. He started exploring the photography medium by capturing images of fellow musicians, their families, and other friends and acquaintances in the music industry. As he continued honing his craft, he merged his love for photography and exploring the outdoors, enabling him to amass lots of photographic work of delightful scenery, rugged mountainscapes, and exhilarating terrain. He also leads photography courses, workshops, and tours to teach other photographers his methods and help them to bring out their own visions. For more from Livieri, you can follow him on his website and Instagram and subscribe to his YouTube Channel.
Author: Andrea Livieri
Source: Petapixel
