I highlighted the promise of Apple’s ProRAW photo capability as one of three key differences between the iPhone 12 mini and the iPhone 12 Pro Max. The others were the larger sensor, and LiDAR scanner for low-light autofocus and Night Mode portraits.
Night mode portraits already blew me away. I couldn’t immediately test ProRAW as it wasn’t available at the time, but the format was added in the iOS 14.3 beta. My colleague Jeff was impressed by his first look at it, and I headed out last night to try it for myself…
Switching between HEIC and ProRAW is very easy, thanks to Apple providing a toggle in the Camera app. There are two reasons you’ll want to easily switch between the two.
The first is file size. HEIC images typically fall in the 1-2MB range; ProRAW files seem, from my limited testing, to be in the 20-25MB range. That means they occupy around 15 times the size — or, to put it another way, you’d be able to store 15 times fewer photos on your phone if you left it on.
The second reason is the nature of RAW images — so let’s get into that a little (skip the next couple of sections if you’re already familiar with RAW)…
What are RAW files?
Higher-end cameras let you choose between RAW and JPG formats.
When you shoot in JPG, the camera applies automatic adjustments to the image as it saves it. These adjustments will be the camera manufacturer’s attempt to analyze the image, identify the type of shot, and then apply a set of adjustments geared to producing the type of image most people prefer for that type of photo.
For example, when the camera identifies that a person is the main thing in the frame, it will apply adjustments designed to flatter skin tones. When it detects a landscape, it will typically boost saturation and contrast — and so on.
A photographer, however, might have other ideas – wanting a different style of processing to that applied automatically by the camera. Additionally, all in-camera processing involves compromises. Some forms of processing will lose detail in the highlights, for example. This processing is a form of destructive editing, because once the changes are made, it may not be possible to reverse them. Any editing done to a RAW file, in contrast, is non-destructive.
Things get a bit more complicated with the iPhone and other smartphone cameras, because they typically take a series of photos, not a single one, and then combine them into a composite image. If you decide you want to recover highlight detail, for example, the iPhone may be able to pull that data in from an underexposed frame. But the principle remains the same: if you want as much data as possible to work with in your own edits, you want your starting point to be the raw data captured by the sensor, before the phone has done any kind of processing to it.
Which is the second drawback of RAW
In addition to being larger files, RAW images are not intended for immediate viewing: they are intended for editing. If you view a RAW image as-is, it won’t look anything like as good as a processed JPG. So if you’re not intending to edit a photo, you won’t want to shoot in RAW.
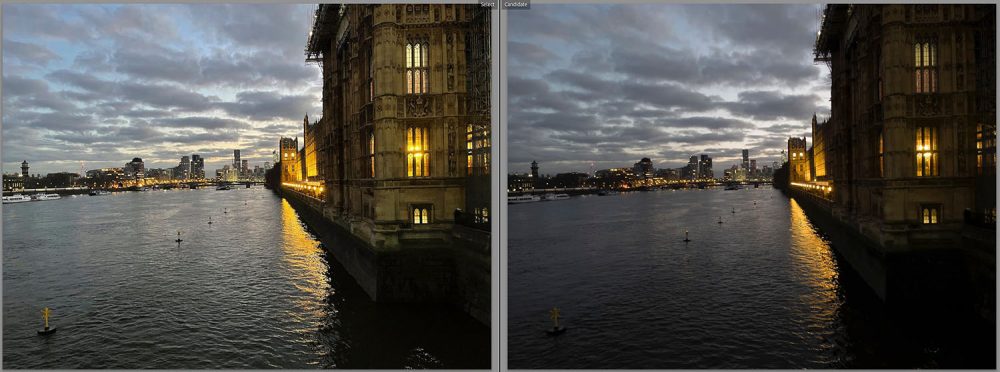
Here’s an example: the HEIC image left, unedited ProRAW right:

The RAW looks dark, muddy, and muted. So seriously: don’t shoot RAW unless you’re going to edit your photos. (We’ll see the comparison with the edited shot below.)
As an aside, this type of dark look is common in unedited RAW photos, but ProRAW seems — at present — to be especially extreme in the loss of visible shadow detail. Lightroom has not yet been updated to take full advantage of ProRAW, but I saw the same thing in Apple’s own Photos app, which has.
Of course, I’m using the first public beta to include the ProRAW feature, so I’m sure it will improve over time.
What is Apple ProRAW?
ProRAW is Apple’s own RAW format: a 12-bit RAW DNG with 14 stops of dynamic range.
Technically, it’s also not a true RAW file — but that’s a good thing. A true RAW file is the actual data captured by the sensor and nothing else. But modern iPhones use a lot of computational photography. A true RAW image wouldn’t have the benefit of any of that.
ProRAW is Apple’s attempt to give us the best of both worlds. To include computational photography features, but also to give us a file with as much data as possible for use in editing. Here’s how Apple’s senior manager of camera software engineering, Alok Deshpande, describes it:
It provides many of the benefits of our multi-frame image processing and computational photography, like Deep Fusion and Smart HDR, and combines them with the depth and flexibility of a raw format.
In order to achieve this, we constructed a new pipeline that takes components of the processing we do in our CPU, GPU, ISP, and neural engine, and combines them into a new deep image file, computed at the time of capture, without any shutter delay.
Testing ProRAW
As always, the greatest test is in low-light shots, so I headed out in what passed for the blue hour in London last night — which was more like the gray hour in reality!
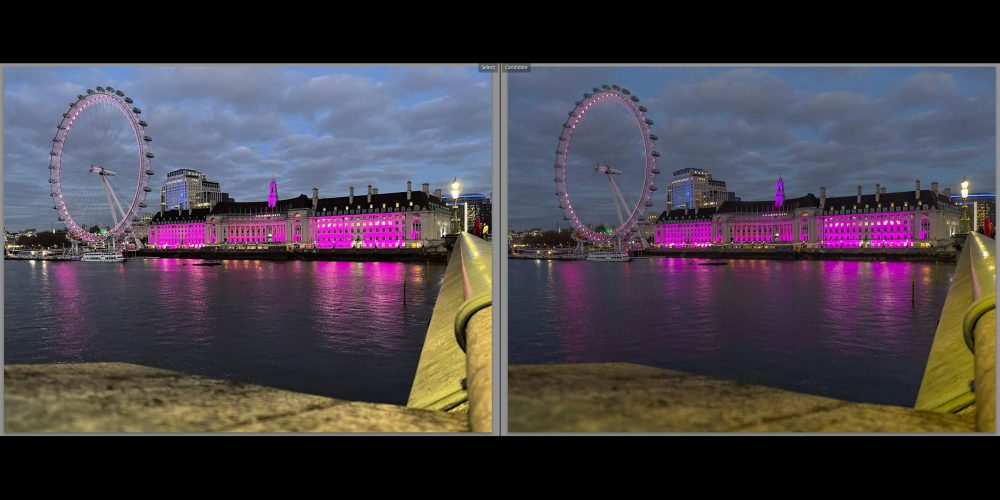
Let’s start with the header photo: the London Eye and County Hall from the other side of Westminster Bridge. As with all the samples, you can open the image in a new tab to see it at a larger size.

Left is the HEIC; right is the edited ProRAW. (By the way, don’t worry about the color difference: the lighting cycles through colors, and although I did my best to catch it at the same point in the cycle, it was redder in the first photo.)
The first thing to say is that Apple’s automatic processing is extremely good. The phone has done its job of creating the kind of image that most people like to see. You may well prefer the image on the left. However, it does have a number of technical weaknesses.
First, it has significantly overexposed. It has made the scene look much brighter than it was. That is particularly noticeable in the sky. Again, if you care more about pleasing aesthetics than accuracy, this isn’t necessarily a problem — but, even from a pure aesthetic viewpoint, it is problematic, as we’ll see when we zoom in.
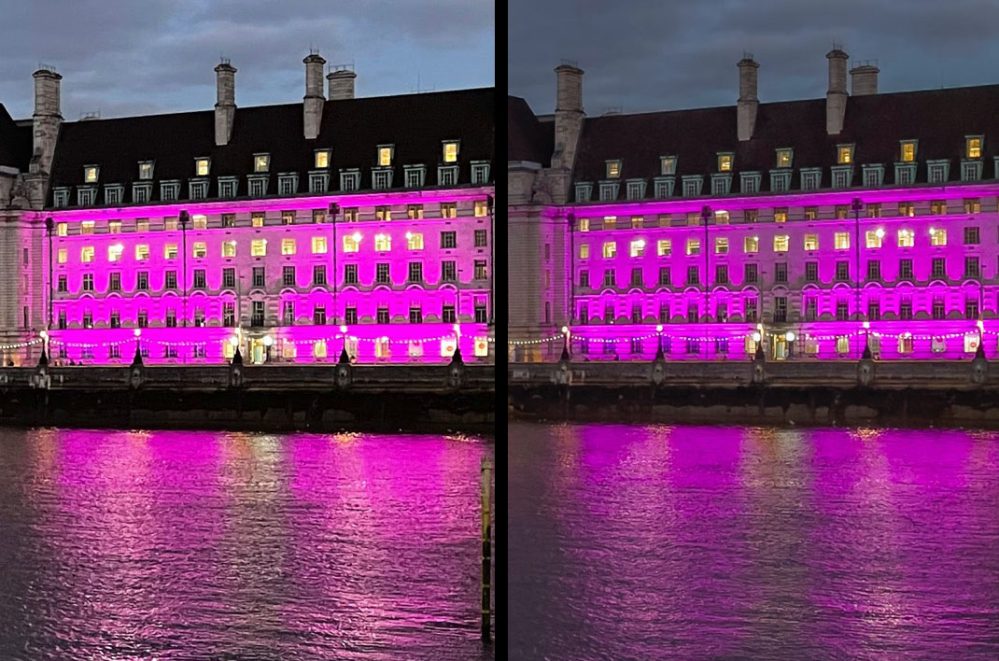
Let’s take a closer look — HEIC left, ProRAW right:

Look first at the three roof windows, top-right. There is some interior detail visible in the RAW that is blown out in the HEIC.
Next, track directly down to what Brits would call the first floor and Americans call the second floor — the one with the arches. There is detail in the RAW that is lost in the HEIC.
Third, look at the reflections in the water. In real life, the reflections were very much of the building color, with a little white. The RAW image has caught this well; the HEIC has a lot more white in it. This remains the case in other shots I compared with different color lighting.
Now, three quibbles are possible here. First, you might still prefer Apple’s processing to mine. There’s nothing wrong with that if you do: I obviously edit to my own tastes, just as you would be able to edit to yours. The point is that the ProRAW images gives you more scope to perform those edits.
Second, you might argue that I could equally well have edited the HEIC to my tastes, for example reducing the exposure or pulling back the highlights to remove some of the white from the reflections in the water. That’s true, but the RAW image gives more data to work with. When I tried that with the HEIC, I was able to reduce the white light, but at the cost of losing some of the colored light, too.
Third, you might argue the differences in the end result are rather minor. That’s also true. I’m not claiming the the ProRAW version is orders of magnitude better than the HEIC. The differences are relatively small — but small details will matter in some shots. To me, it’s worth having the capability.
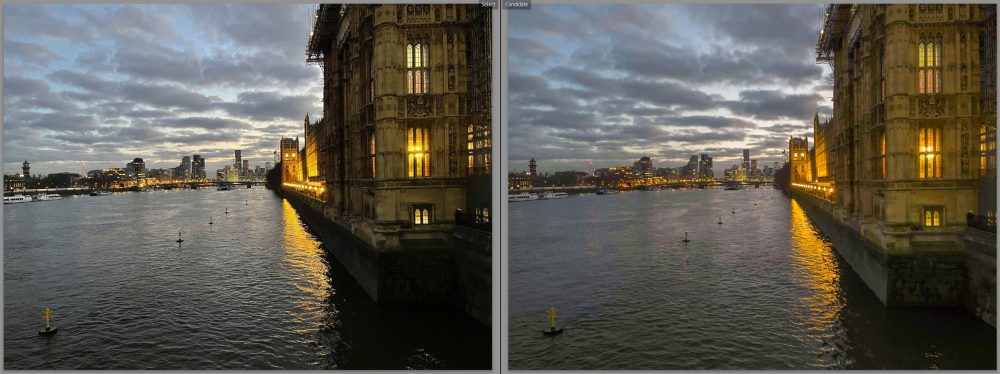
I found similar differences in each of the other shots. Here’s the House of Commons shot, again Apple’s HEIC left, edited RAW right:

I won’t labor the point: suffice it to say the same applied to the other photos I tried. The RAW gave a better starting point for edits, and – to my tastes – a better end result than Apple’s HEIC. As I say, I do think Apple has work to do yet on ProRAW, but the proof is already in the editing.
You can’t use ProRAW for Portrait mode
I mentioned earlier that ProRAW isn’t a true RAW format, as it still allows the use of some computational photography features. Not all of them, however: If you select Portrait mode, which relies very heavily on computational photography to add layers of artificial blur, the RAW toggle is not available.
ProRAW is the clincher for me
There’s an obvious downside to a format in which editing is mandatory rather than optional: Even if it’s just the two-minute edits I did on these, it still adds up if you’re taking a lot of photos. For everyday shots, I’m absolutely sticking to HEIC and doing any edits in the Camera app. But for travel and other special shots, it’ll be ProRAW and Lightroom all the way.
Night portraits, and the general increase in detail already seen in low-light shots, had already pretty much made my decision for me. The additional capability provided by even the first generation of the ProRAW format is merely the clincher.
There may be more iPhone 12 Diary pieces to follow — there’s a lot I haven’t yet tried with the phone, like video – but my decision is made: I’ll live with the size. Much as I’d love that little iPhone 12 mini, it’s the iPhone 12 Pro Max I’ll be keeping.
Author: Ben Lovejoy
Source: 9TO5Google


