Waze provides a lot of function and a little bit of a social atmosphere for drivers on the road. With that, using Waze on Android Auto can prove quite useful. This guide will bring you through how to add and use Waze with Android Auto.
For a large number of users, Waze is a go-to app for navigation. Whether you’re making a five-minute commute or running across the country, Waze has tools to make it easier to get there safely and early.
How to add Waze to Android Auto
In order to use the navigation app on your Android Auto display, you need to have the app installed. Since Android Auto pulls data from your device, you only need the app installed on your Android phone. If you haven’t installed Waze on your phone, go ahead and do that.
- On your Android device, open the Google Play Store.
- Search for Waze.
- Install the Waze app.
- Open the app and sign in.
- Note: Opening and setting up the app prior ensures that Waze will work properly when connected to Android Auto.
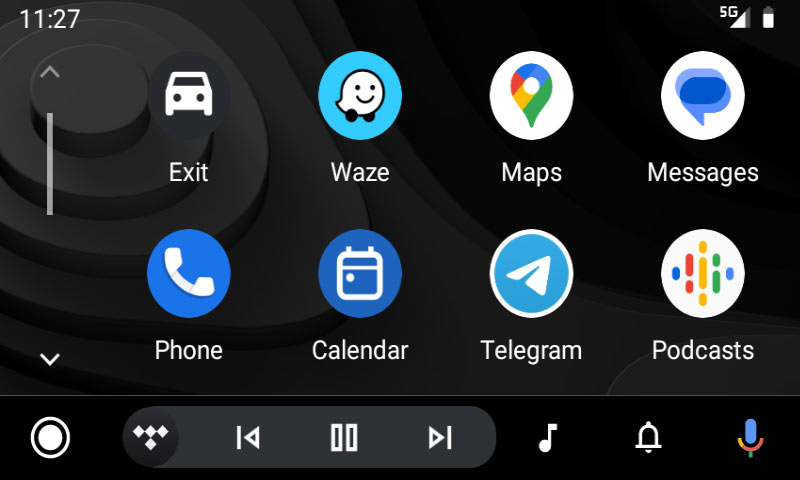
Once you have Waze installed on your device, you’ll need to get connected to Android Auto. After doing that, you’ll notice Waze in your app drawer on your Android Auto display. Tap it to open the navigation app and start using it.

Using the app is just as easy as using Google Maps. You can search for destinations via the display, or type using your phone. From there, you’ll get constant traffic info and tools for marking hazards, speed traps, and more.
If you plan on using Waze often, you’ll want to move it up in your app drawer. To do this, you need to adjust a setting on your phone through the Android Auto app.
On Android devices running Android 12 or 13, you’ll need to find this app through the settings. Prior to this update, the Android Auto app was standalone.
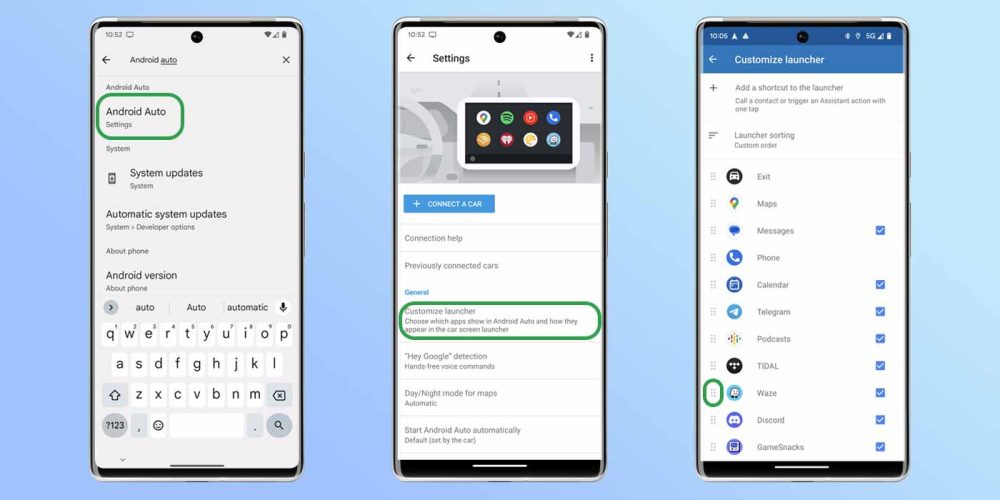
- On your device, head to the settings.
- Search for Android Auto.
- Tap the first result to open the Android Auto app.
From the app on your device, you have control over a few options. One important one is app drawer customization. With that, you can ensure Waze sits on the first page on your Android Auto display.
- In the Android Auto app, tap Customize launcher.
- Find Waze in the list and hold on to the grid icon to the left of the Waze icon.
- Drag it to the top, and place it where you want it.

While that makes a huge difference, it would be better if you could make Waze your default navigation app for finding directions through Google Assistant. Unfortunately, it remains Google Maps for now. Even with that being the case, moving Waze up to the first page makes it much easier to get on the road faster.
Troubleshooting Waze
Even officially supported apps don’t always work as expected. With that, Waze will sometimes run into issues. The most common one is a blank map view, wherein the app becomes useless.
The first thing you can try is disconnecting your Android device and reconnecting it; doing so will effectively restart Android Auto. If you want, you can also force-stop Waze while your phone is disconnected.
In rare cases where the latter doesn’t work, we suggest restarting your car. Even powering off Android Auto’s display alone doesn’t always fix the issue. Restarting your vehicle is a full refresh, giving you the best chance of getting Waze to work.
Most of the time, though, Waze is a fantastic companion to Android Auto. Getting it installed and ready to use on your vehicle’s display is generally pretty easy and takes little to no time at all.
More on Android Auto:
- Android Auto settings menu is finally getting dark mode with Material You redesign [Gallery]
- Android Auto appears to be cutting off support for older phones with forced update
- This Android Auto unit works wirelessly and can be installed in seconds in any car
Author: Andrew Romero
Source: 9TO5Google


