![]()
When you hear “long exposure,” you probably think of a shutter speed that’s too slow to hand-hold and produce a sharp image. It might be something like ¼”, or maybe as long as 30”, which is the most common slowest shutter speed in DSLR and mirrorless cameras. However, shutter speeds slower than 30” can be advantageous in many long-exposure scenarios.
Bulb mode allows you to keep your camera’s shutter open as long as you hold the shutter button (with some limitations and tricks). This guide will help you understand the bulb mode on your camera and how to use it for long-exposure photography.
The Origins of the Word “Bulb”
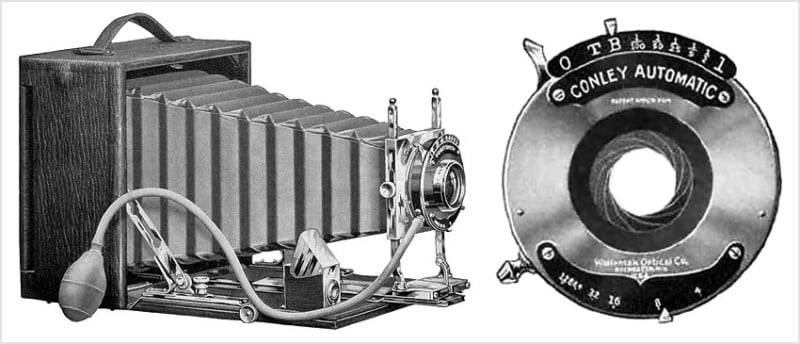
Today, bulb mode most commonly refers to the camera mode or shutter speed setting that allows you to keep the camera’s shutter open as long as the shutter button is pressed, but the term “bulb” comes from the shutter release system that was used on early cameras. Long before digital cameras, view cameras and folding cameras generally used a rubber bulb as a detachable shutter release.
When a photographer squeezed the rubber bulb in bulb mode then, the shutter would be opened, and when they released the bulb and let it reinflate, the shutter would be closed. Thus, a photographer could have their camera’s shutter stay open and achieve indefinitely long exposures by squeezing and maintaining pressure on the bulb.

The Basics of Bulb Mode and Where To Find It
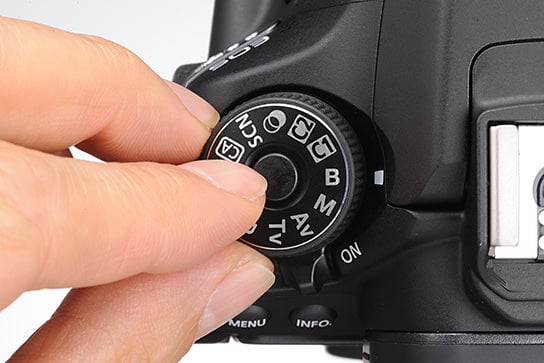
On some cameras, bulb mode is accessed by turning to a separate mode on the mode dial. If your camera has a dedicated bulb mode, it will usually be abbreviated as “B.”

Otherwise, cameras will usually have a bulb shutter speed that is one increment lower than their slowest timed shutter speed. This is accessed in manual (M) mode. Simply set your camera to Manual mode and adjust the Shutter Speed to the slowest possible value, and BULB and/or B should appear.
Keep in mind that some cameras do not have bulb mode, so if you’re having a hard time finding the bulb mode on your camera, consider reading your manual or searching the internet for more information.
Other than the mode itself, the only other thing you’ll absolutely need to use bulb mode is a sturdy tripod. Long exposures are very prone to camera shake, and even the slightest camera movements will produce a blurry image.
Tip: In theory, exposure time is only physically limited by battery life in bulb mode on a digital camera, and it can be extended using a vertical grip or other multi-battery solutions.
Ways to Use Bulb Mode in Photography
You’ve found bulb mode on your camera, so now it’s time to learn how to use it. Although this requires some understanding of camera settings, bulb mode is also a great way to learn.
Unpredictable Subjects at Night
Bulb mode is particularly useful when you are shooting long-exposure images of subjects that have a varying duration or unpredictable occurrences.
For example, fireworks are hard to predict, varying in duration, and you usually don’t want to have too many in one image. If the average firework lasts 10 seconds (this is just an example – a good baseline depends on your situation), dial in your aperture and ISO using a 10-second exposure, and then switch to bulb mode. When you want to begin your firework exposure, press the shutter button and hold it. When the firework you are capturing is gone, release the shutter button. This will produce a long-exposure photograph that only contains the firework you want.
![]()
An important thing to remember is that a shorter shutter speed will allow less light to reach the sensor, so if you happen to image a firework that is only five seconds long and you originally set your aperture and ISO to expose for a 10-second firework, your image will be too dark. This is correctable (to an extent) using post-processing, but you should also be aware of images being consistently too dark or too bright and correct for that by changing your aperture and ISO.
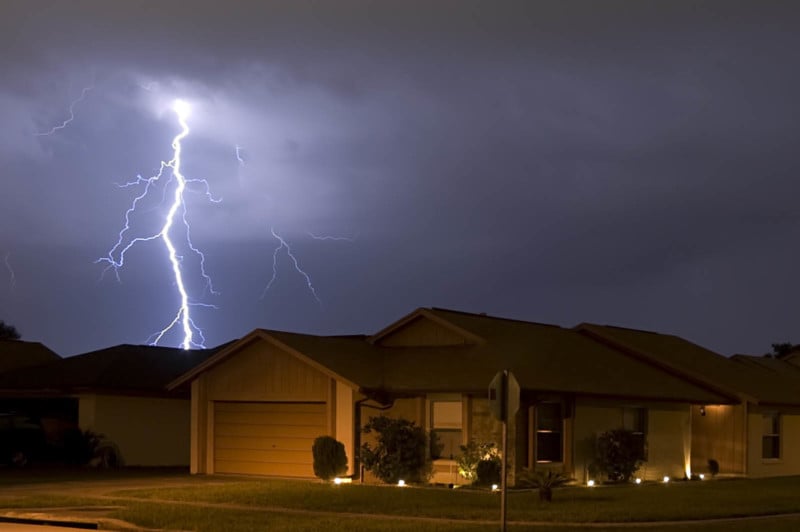
Bulb mode can also be useful for capturing lightning strikes, as it is impossible to predict exactly when a strike will occur during a thunderstorm. A photographer can use the mode to expose a photo until a lightning strike occurs in the frame.

Varying long-exposure photography using bulb mode is also useful when photographing light trails. For example, if you are photographing a road at night that doesn’t always have cars on it, it’s hard to know how long of an exposure you will need to photograph a car going down the road fully. With a bit of aperture and ISO testing using a ballpark shutter speed, you can be ready for when a car comes down the road.
The beauty of bulb mode is that you get to dictate exactly how long your exposure is, so if you are in the ballpark of having a well-exposed image, it doesn’t matter if you have to keep your shutter open a bit longer in bulb mode to capture an entire light trail. It’s much easier to darken an image via post-processing than to fix a light trail that stops too early.
Light Painting
Light painting is very similar to the other types of varying long-exposure photography mentioned above. This is the process of using a flashlight or any other light source to write, draw, and manipulate a dark scene. As the name suggests, it allows photographers to make images that are essentially paintings created with light. Without bulb mode, photographers are limited to somewhere around 30 seconds to do all of their “painting,” which makes complex light paintings close to impossible to achieve in one exposure. However, bulb mode unlocks the world beyond the 30-second shutter speed and allows light painters to draw for minutes at a time.
![]()
Here is a gear tip: When you first access bulb mode, it will appear that you have to physically hold down the shutter for your desired exposure time. This would make something like light painting nearly impossible without an assistant. However, this is where a remote shutter release, intervalometer, or built-in bulb timer comes in handy. Most remote shutter releases plug into a port on your camera and will have a “lock” that allows you to activate the shutter and then keep it activated until you manually deactivate it.
Intervalometers are similar to remote shutter releases, and usually have a “long” mode that allows you to specify how long you want the shutter to be open. You should also check to see if your camera has a “timed exposure” or “bulb timer” mode (this is sometimes accessible in the settings menu), which will allow you to set a custom exposure time in the camera itself, eliminating the need for an external device.
Astrophotography: Star Trails
This article will only scratch the surface of astrophotography, but bulb mode is frequently used in different types of astrophotography. In one application, star trail images are made using anywhere from 10 minutes to hours of exposure. The rotation of the earth causes stars to appear as streaks in the sky over long periods of time and adds a unique twist to landscapes.
![]()
Bulb mode allows you to expose for long amounts of time, and this is a great choice for star trail photography.
Note that while it’s possible to create great star trail images using extra-long exposures (i.e. 10 minutes or more), most photographers stack several long-exposure images together to get their final product. This is because long exposures heat the camera sensor, which produces thermal noise and hot pixels. Both artifacts are difficult and painful to remove, and photographers generally try to avoid them as much as possible. For example, instead of making one 30-minute exposure, photographers might use bulb mode to make 30 consecutive minute-long exposures. This also gives the photographer more confidence (and less risk) in exposing the scene correctly.
![]()
Astrophotography: Stars with a Tracker
Just like star trails, this application of bulb mode has many layers. One of the biggest complications of astrophotography is the lack of overall light. In simple terms, astrophotographers usually have to increase their ISO to high values before being able to produce well-exposed images of stars. This produces grainy noise that makes images less desirable. One way around this issue involves bulb mode and using a longer exposure than what is typically accessible in a traditional mode.
For example, a two-minute exposure allows for a much greater amount of light to hit the sensor, eliminating the need for such a high ISO value. The challenge with this in star photography is that, as mentioned above, the rotation of the earth creates star trails at long enough exposures. In order to use bulb mode for spot star (as opposed to star trail) photography, star tracking devices are implemented to compensate for the rotation of the earth and produce spot stars at very long exposures using bulb mode.
![]()
Note: As with star trail photography, thermal noise and hot pixels are still challenges that come with star photography using a tracker. While this doesn’t work for star trail photography (the images have to be as consecutive as possible), astrophotographers often pause between shots when using a tracker so that their sensor has time to cool down and minimize thermal noise.
Bulb During the Day: Neutral Density (ND) Filters
Bulb mode typically cannot be used during the day without an ND filter, which is a device that blocks light from hitting the sensor. Daytime is generally too bright for the type of long-exposure photography that is enabled by bulb mode, so filters are used to block excess light and allow for long exposures at all times of the day.
With a dark enough ND filter, photographers can achieve exposure times of a few minutes or more in the middle of the day. This is often used when photographing moving water because it creates a silky-smooth effect.
![]()
![]()
![]()
It’s also possible to use this technique to get rid of crowds of people because if they’re moving over a period of a few minutes, they won’t show up in the final image. There are many abstract possibilities unlocked when doing extra-long exposures during the day.
Conclusion
Whether you’re looking to photograph something that is constantly varying in duration or capture five minutes of starlight in one photograph, bulb mode is a great way to better understand shutter speed and the principles of advanced photography.
With some additional gear, bulb mode can be used during the day to create silky-smooth water landscapes, but it can also be used with just a camera and a tripod to create fascinating star trail images.
There are incredibly fun, experimental, and unique opportunities unlocked using bulb mode on your camera.
Image credits: Photographs, unless otherwise noted, by Justin Hein
Author: Updated
Source: Petapixel


