iPhone and Apple Watch provide some really useful features when it comes to health and fitness and they also include important tools to get help in case of an accident, injury, and more. Follow along for how to make sure your Medical ID is set up or up to date, along with how to customize the SOS settings on iPhone and Apple Watch. We’ll also look at the new share Medical ID during emergency calls feature.
: Apple is bringing a new option to automatically share your Medical ID info with first responders when your Apple Watch or iPhone makes an emergency call. This feature is available with iOS 13.5 and watchOS 6.2.5 (still in beta, public release coming soon for both). Read along below for how to set that up as well as update/set up Medical ID and SOS.
Both Medical ID and SOS can be life-saving features. Neither one is a shiny feature that is used on a regular basis, which is why it can be easy to not have Medical ID set up, or in the case of SOS, be unsure how to use it. But they are both very valuable to have set up and understand how they work.
Medical ID allows users to store important health information along with emergency contact details that first responders can access from the Lock screen on iPhone and Apple Watch and with iOS 13.5 your Medical ID can automatically be sent to first responders when an emergency call happens.
As for SOS, there are two ways to activate the emergency feature.
How to set up or update Medical ID on iPhone
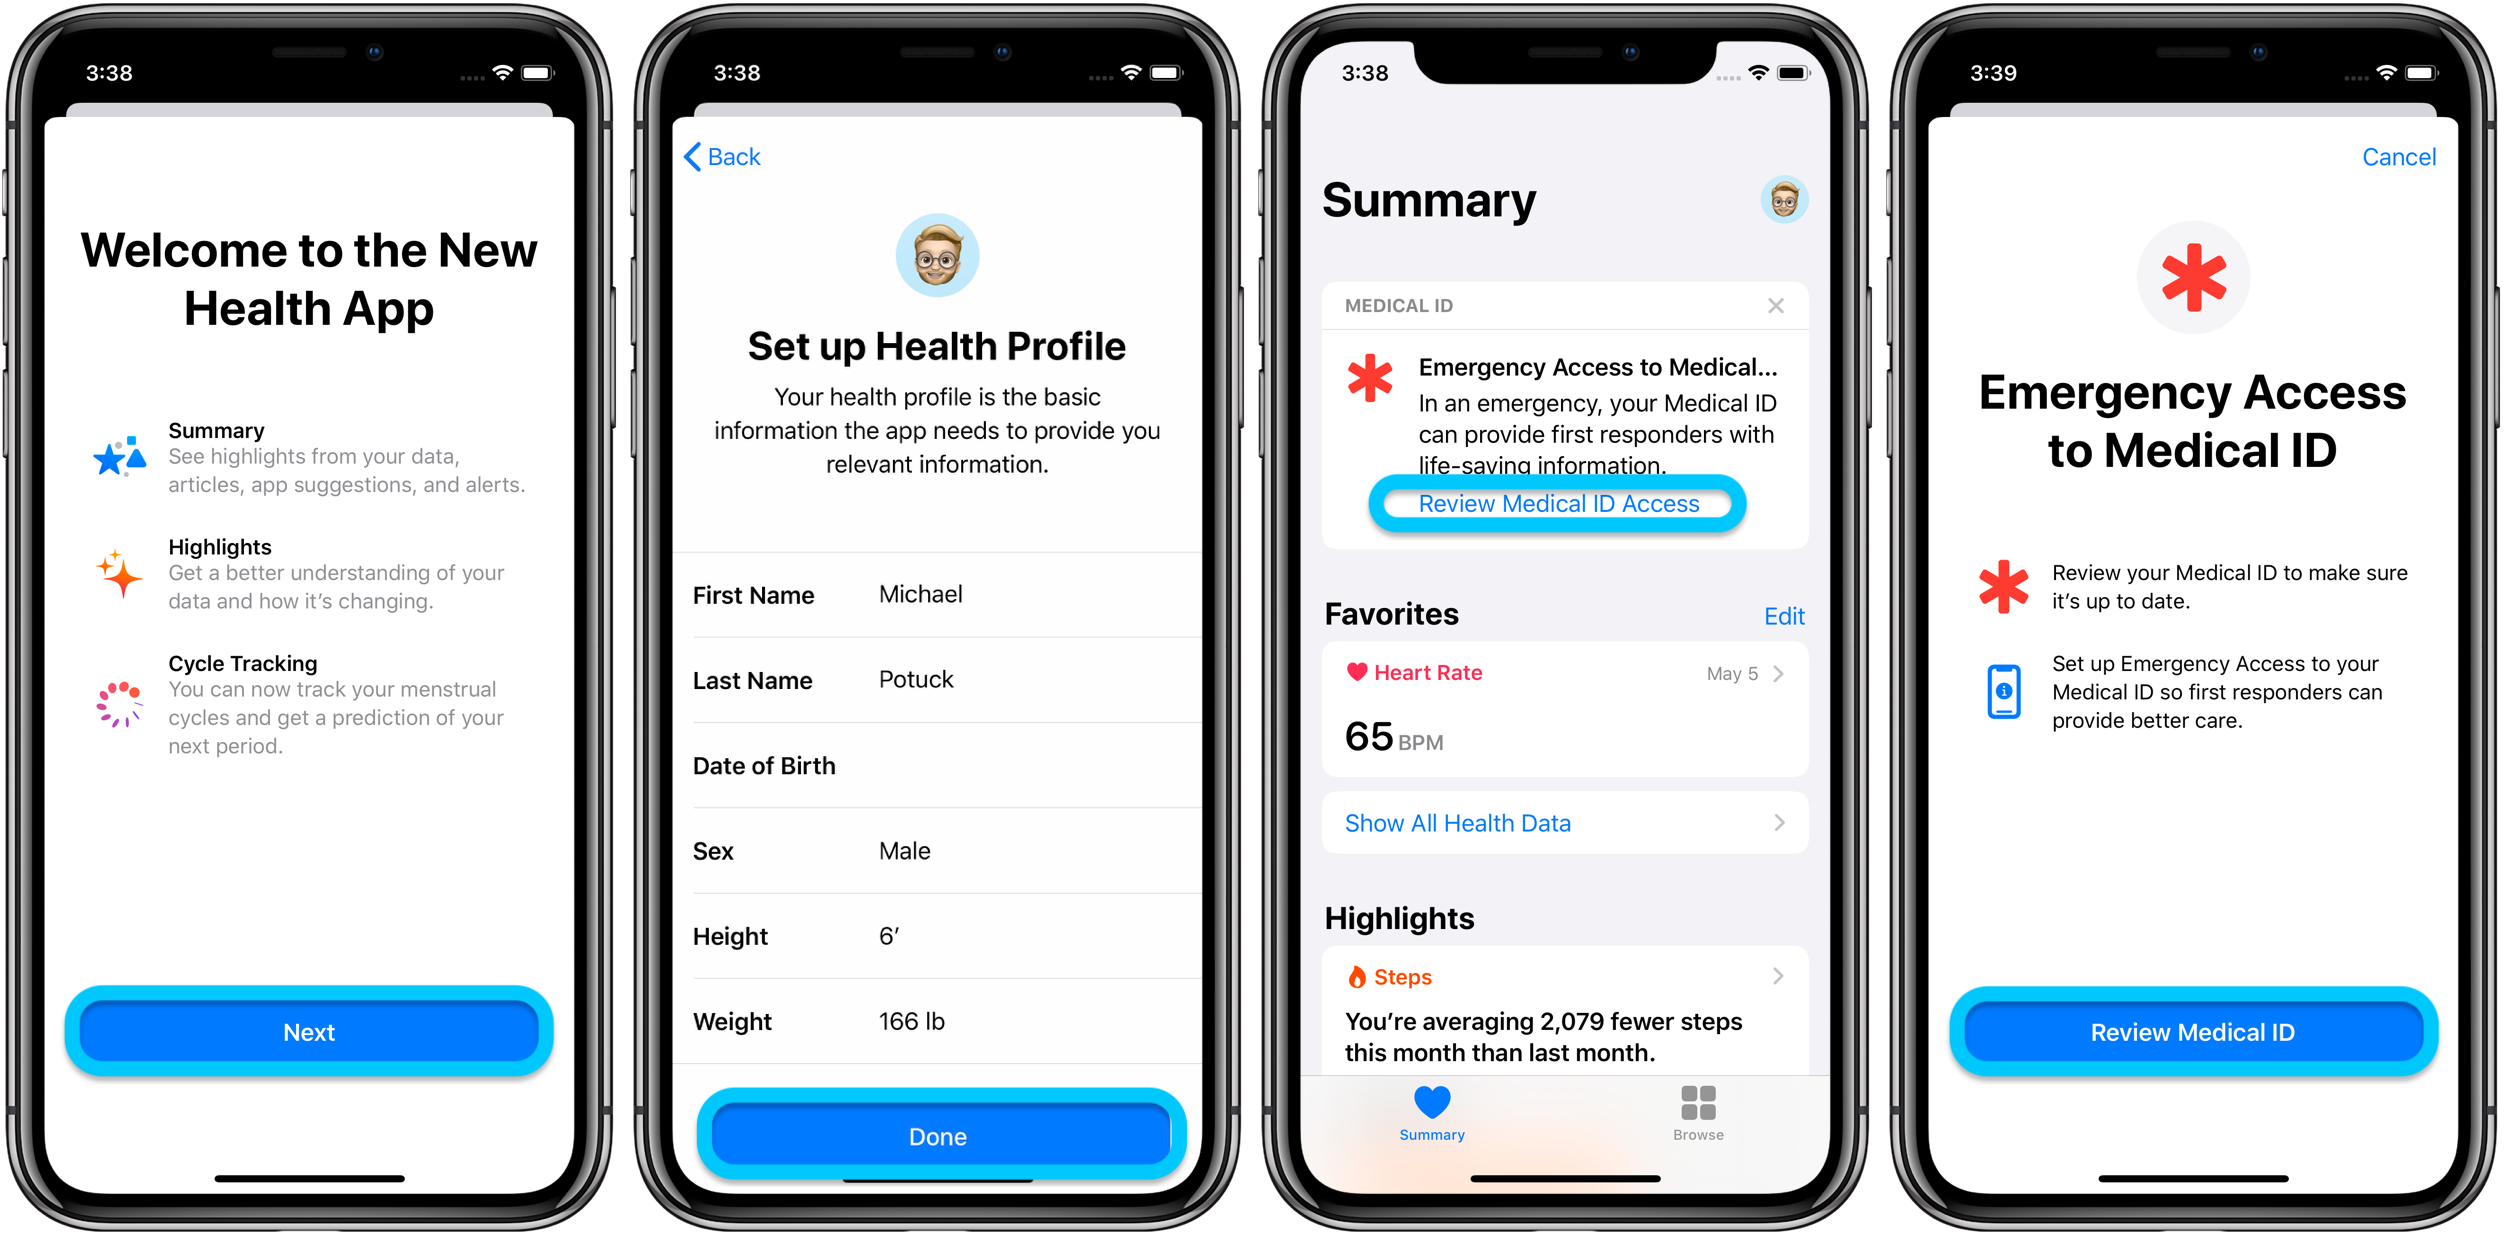
- Launch the Health app
- Work through the new welcome splash screen that will let you set up or update your Medical ID as well as turn on the new sharing during emergency calls feature
- Tap when finished
Here’s how this looks in iOS 13.5:

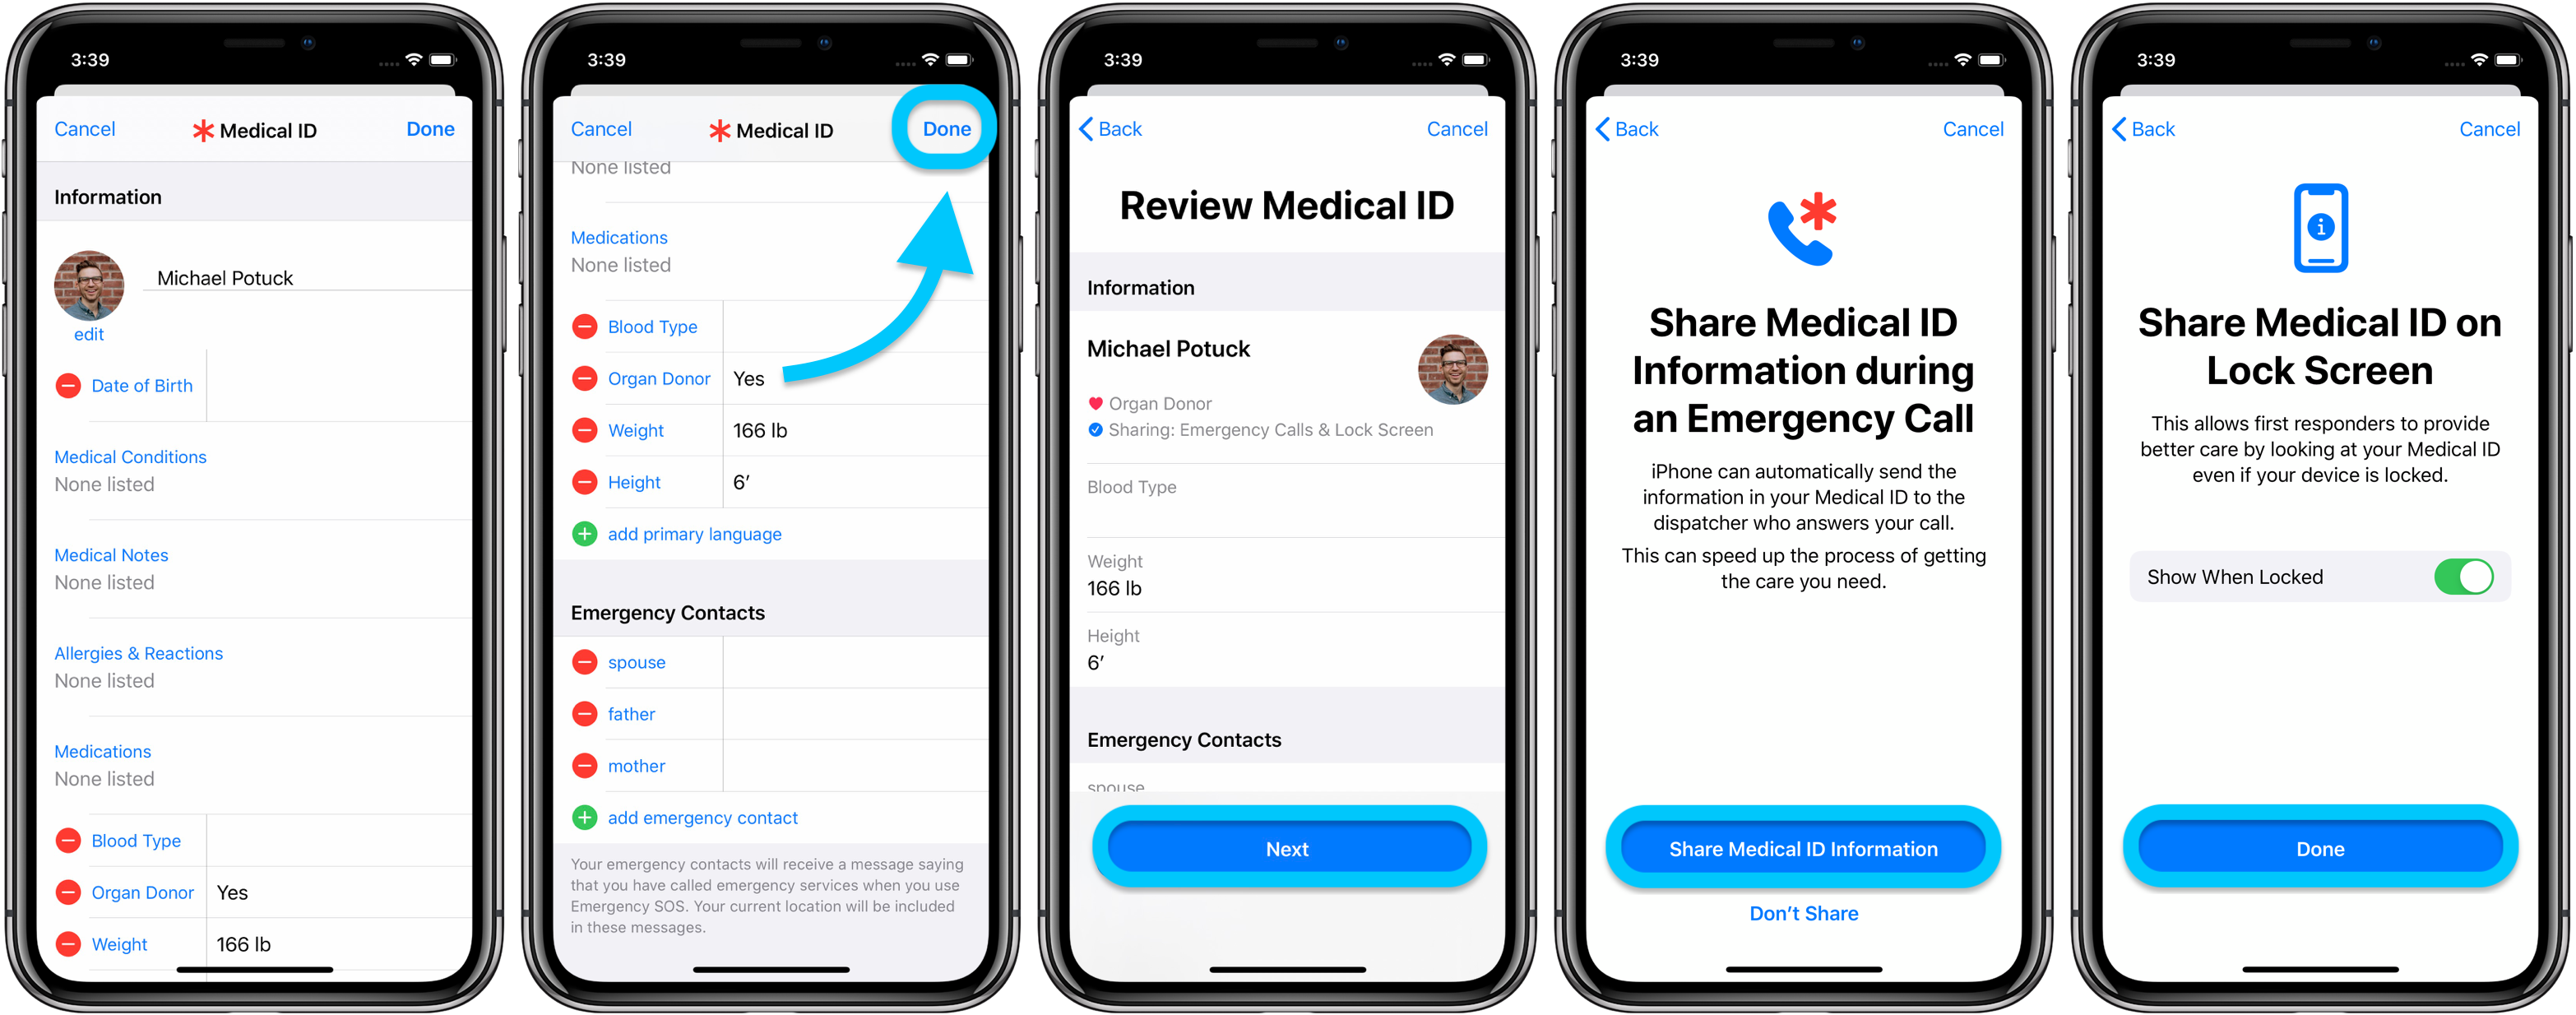
After you’ve updated or set up your Health profile, tap at the top of the Health app and follow the prompts.
Also don’t forget you can add more than one emergency contact, in fact, you can add over two dozen. I didn’t find the limit, but I made it to 25.
When you’re done updating your Medical ID profile, you can review your sharing settings. This is where you can turn on the new “Share Medical ID Information during an Emergency Call.”

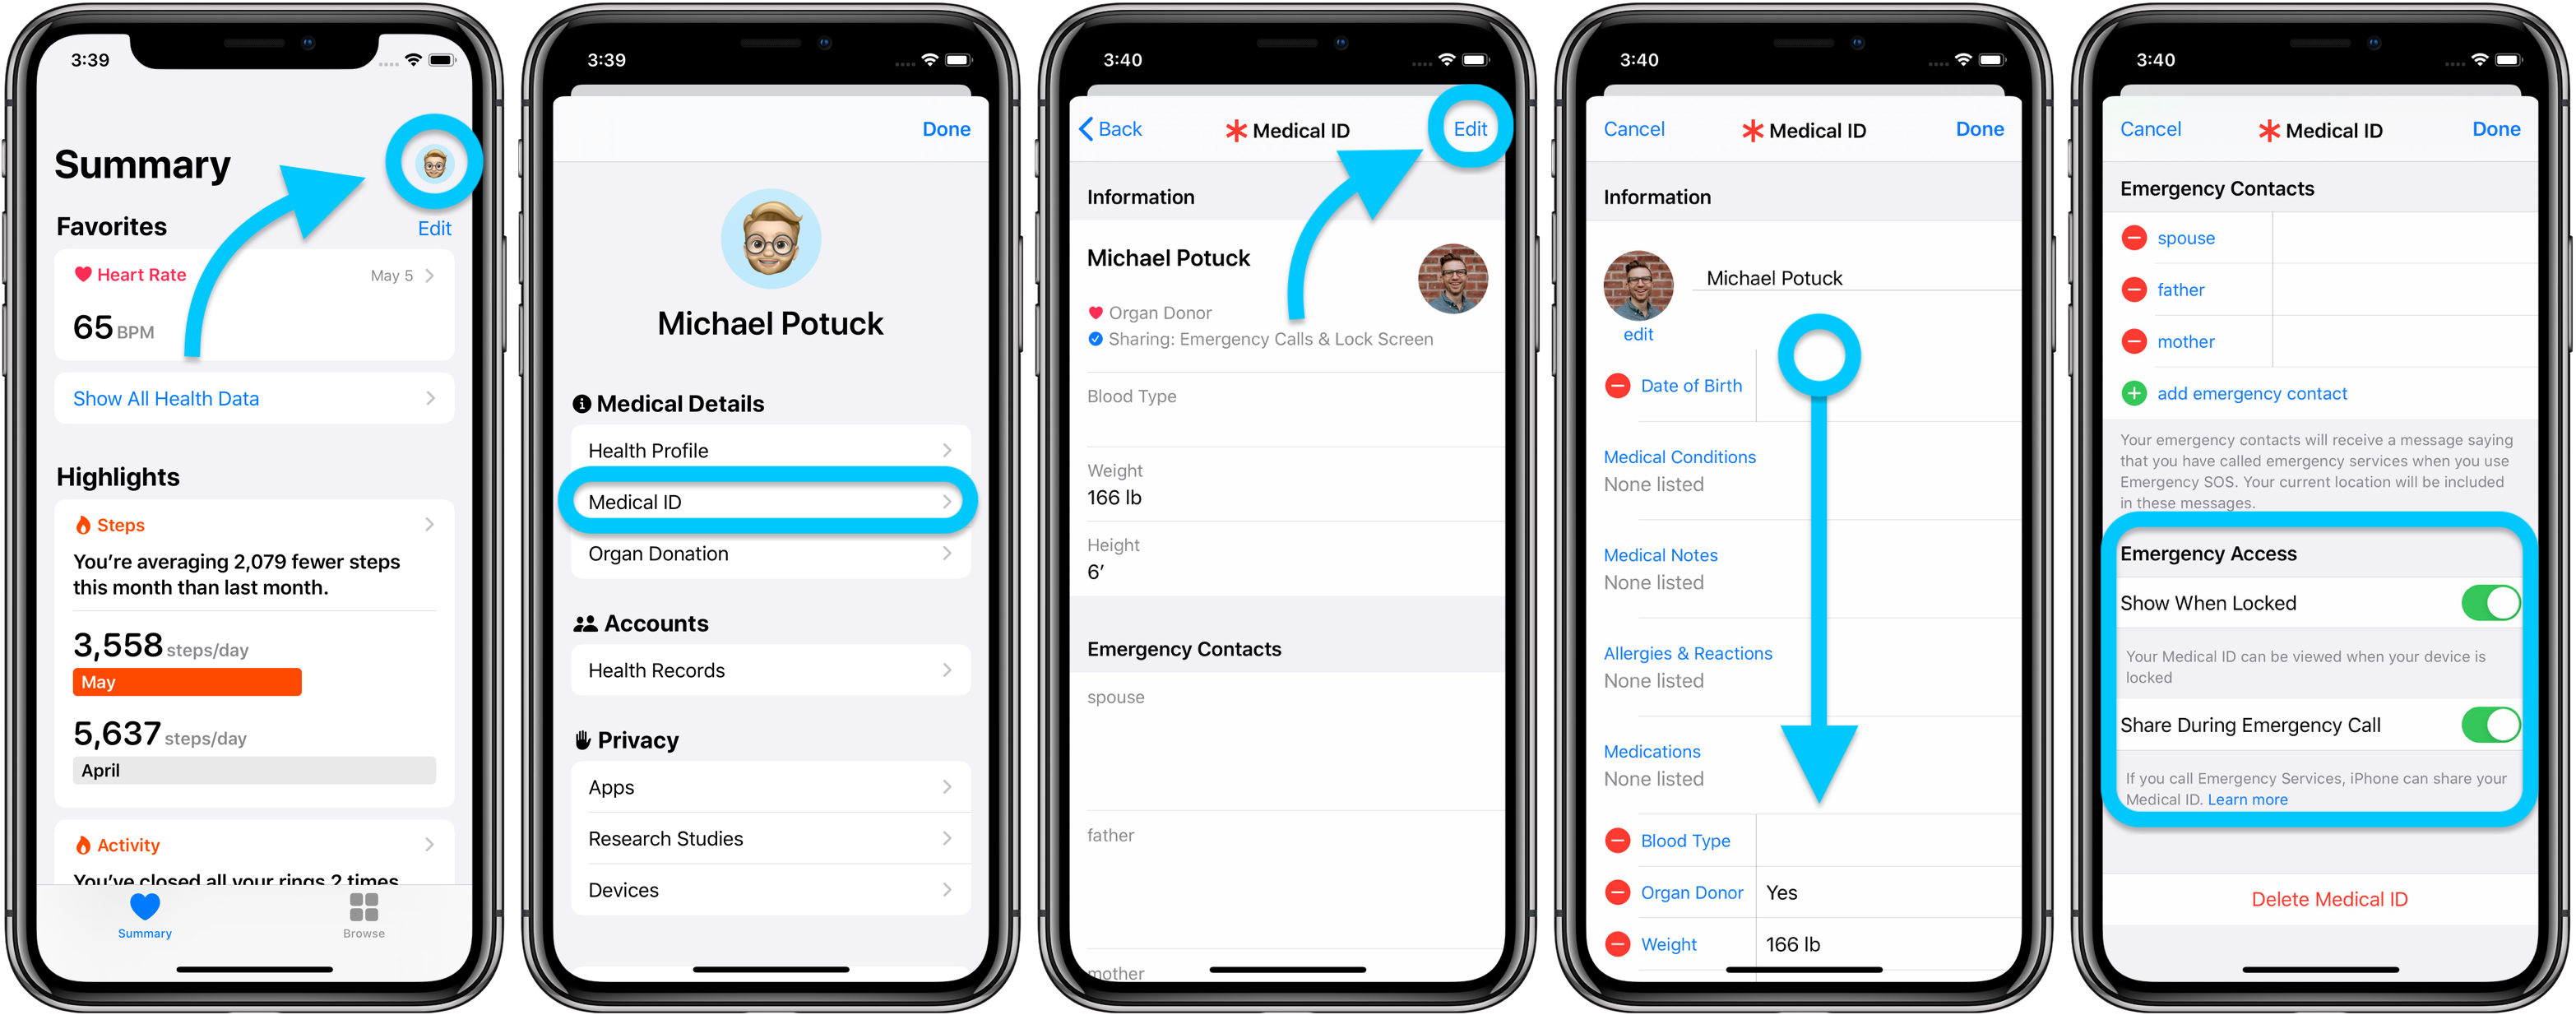
To get back to change these settings anytime in the future, head to the Health app > tap your profile picture in the top right corner > choose Medical ID > Edit > swipe to the bottom.

Apple offers the option to sign up with the national organ donation registry, Donate Life. This is a simple and quick way to sign up for those interested and it travels with you, no matter what state you’re in. Tap the link just above the button for the fine details when you’re editing your Medical ID.
How to set up or update Medical ID on Apple Watch
The great thing about Medical ID is that it automatically syncs from your iPhone to your connected Apple Watch, no need to do anything. If you update your information in the Health app, it should appear on your Apple Watch almost immediately.
The settings in the Apple Watch app are for calculating calorie burn and other health metrics and are separate from your Medical ID profile.
To see what it looks like if someone else would need to pull up your Medical ID press and hold the Side button and a volume button on recent iPhones (just the Side button on the iPhone SE 2020), then swipe from left to right on the Medical ID slider.
On Apple Watch, press and hold the Side button. The Medical ID slider will be available along with the power off and SOS options.
How to customize SOS settings on iPhone
There are three ways to activate the SOS feature on iPhone to call emergency services. Two of the more automatic features are turned on by default in the latest version of iOS.
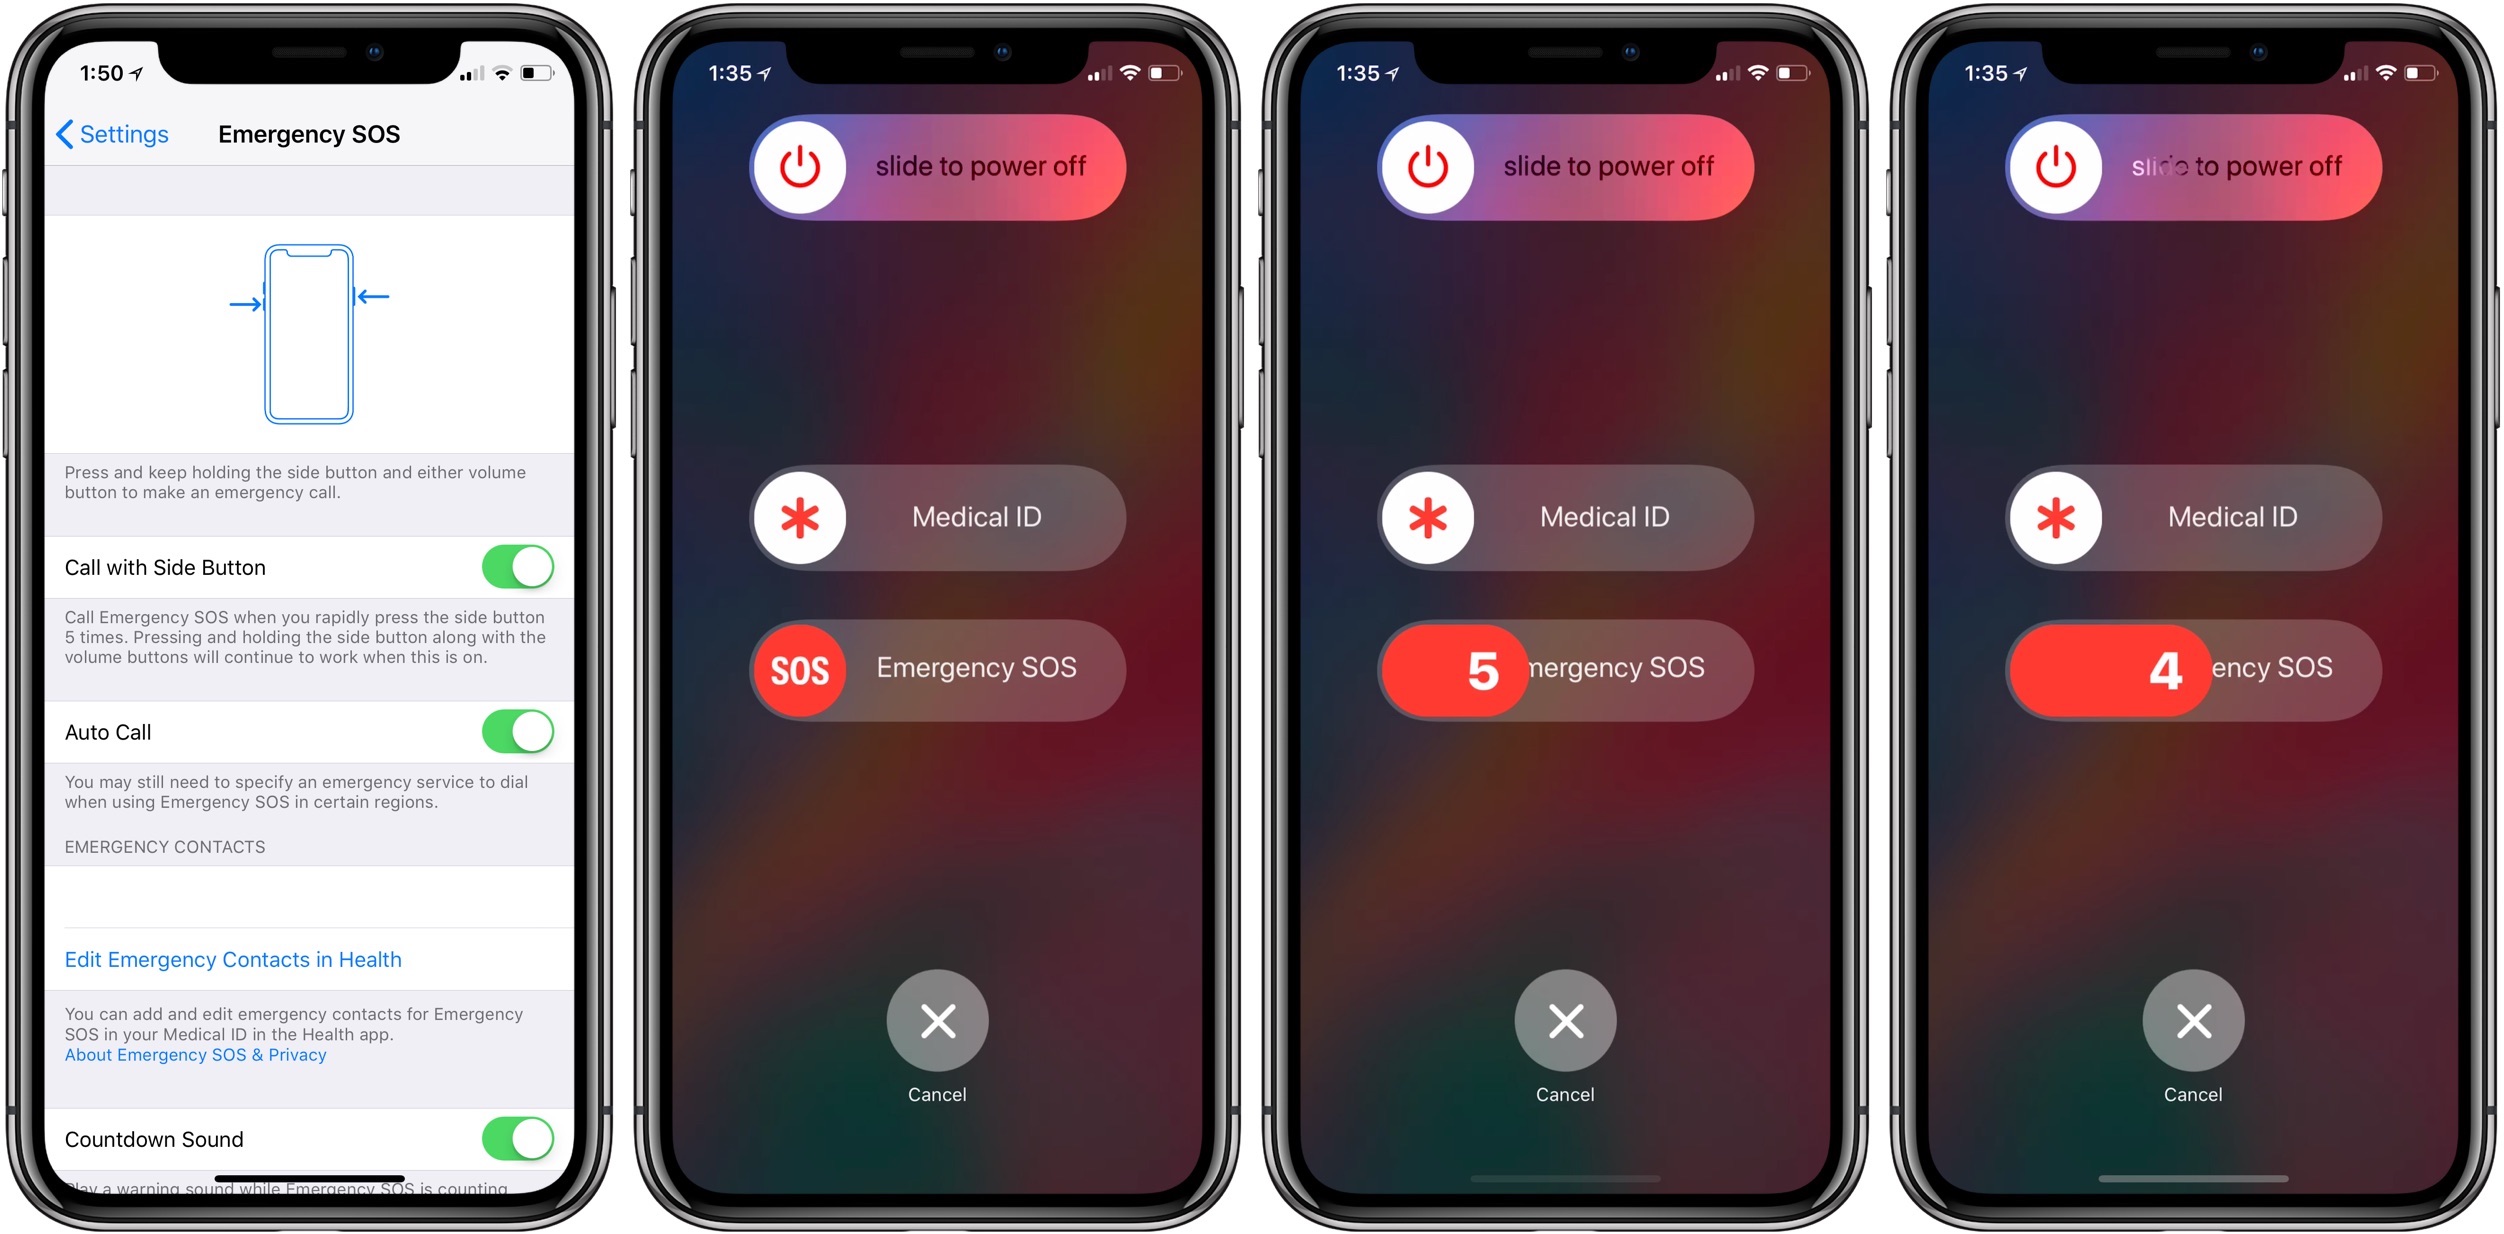
For recent iPhones, users can press and hold the Side button and either of the volume buttons to start a 5 second countdown (previously a 3 seconds). This is called .
The second option is to rapidly press Side button (or sleep/wake button), this is called . The third option is to use the SOS slider on the power off screen.
Here’s how to change these settings:
- Open
- Swipe down and tap on
- Choose which SOS options you’d like to use by toggling options off/on

The countdown sound is on by default, which is a loud, alarming tone to make sure you’re using SOS intentionally. You can also turn this feature off if you think you’d rather be able to make an emergency call discreetly.
If you leave it on, the SOS countdown won’t make any sound for 5 and 4, with 3, 2, and 1 all producing the alarming sound.
If you accidentally call 911, press cancel as quickly as possible (during my testing and grabbing screenshots for this article I unintentionally placed an SOS call, but as I canceled it immediately, no emergency services were sent ?).
How to customize SOS settings on Apple Watch
Apple Watch doesn’t have the rapid clicks of the Side button for SOS. Instead, it features two options. First, users can do an auto SOS call by pressing and holding the Side button. Second, you can press and hold the side button until you see the power off screen, then use the SOS slider.
The auto SOS call feature is turned on by default in the Apple Watch app settings.
- Open the Apple Watch app
- Tap on
- Toggle off if desired
Apple Watch features a loud countdown alert sound like iPhone. However, there isn’t an option to turn it off. Even with your iPhone or Apple Watch set to silent/vibrate the countdown alert will sound.
If you feel like getting a little bit of practice in, just to feel more comfortable with the SOS feature on iPhone and Apple Watch just make sure to let go around the 2-second countdown.
Remember, if you accidentally place an SOS call, you should be able to end it before it reaches emergency services if you hit as quickly as possible.
- How to manage COVID-19 exposure notifications on iPhone
- How to use Apple’s COVID-19 screening app and website for yourself or someone else
- Apple Maps: How to find COVID-19 testing locations on iPhone, iPad, and Mac
- iPhone: How to improve Face ID with a mask
- How to work from home effectively during the coronavirus outbreak
- How to clean and sanitize your iPhone without damaging it
- How to screen share and remote control iPhone, iPad, Mac to help colleagues, friends, and family
Author: Michael Potuck.
Source: 9TO5Mac


