After a few developer previews and the big Google I/O reveal, Android 12 is now available in beta to anyone who wants to give it a shot. Here’s how to get the Android 12 Beta on your Google Pixel smartphone.
Table of contents
Is your Pixel compatible?
The first step to join the Android 12 beta program is to see what devices are compatible with the program. For now, that’s just Google’s own Pixel devices and only those which will get the Android 12 upgrade this Fall. That includes:
- Pixel 3/XL
- Pixel 3a/XL
- Pixel 4/XL
- Pixel 4a/5G
- Pixel 5
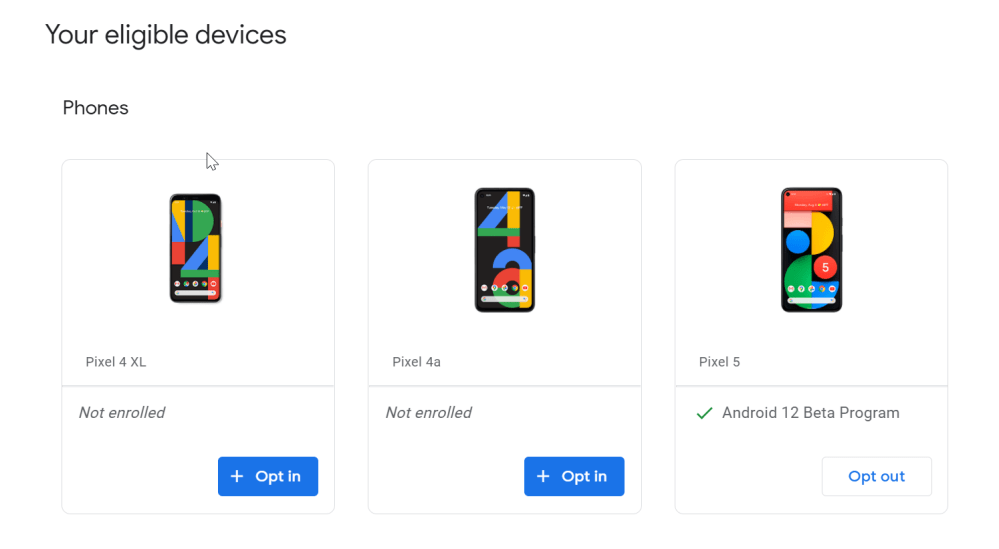
Any of these devices should be compatible with the Android 12 Beta program regardless of region or carrier. To verify your device is compatible, though, you can simply head over to Google’s sign-up page. When you visit the site, any Pixel smartphone linked to your Google account should appear at the bottom of the page.
What is the latest Android 12 Beta?
As of August 25th, the latest version of Android 12 is Beta 4.1 which was launched today for Pixel smartphone. The update is available both over-the-air for users already in the Beta Program and for sideloading too.
How to Enroll in Android 12 Beta Program on Pixel
- Check if your device is compatible
- Opt-in for the beta program
- Install the OTA on your device
Once you’ve ensured you have compatible devices, you can select which ones join the program. To enroll a device, simply click Opt-In, accept the terms and conditions, and then hit Join Beta. From that point, Google will work some magic on its servers to get the update to your device.

After you’ve opted in, it can take anywhere from a few minutes to a few hours to get the update over to your device. You’ll need to ensure you’ve already installed any other updates before this one too. To check for the Android 12 beta update manually, head to Settings > System > Advanced > System Updates.
If you install the beta but later decide you want to go back to Android 11, you can visit this same site and un-enroll your device.
How to sideload Android 12 Beta on Google Pixel
- Download the needed files
- Boot into Recovery mode
- Navigate to ADB sideload
- Connect the handset to a computer with ADB tools installed
- Enter the sideload command
- Reboot your phone
To get started, you’ll first need to download the files needed to actually put Android 12 on your Pixel. There are two ways to do so. First, you can install a Factory Image, which wipes your phone and starts everything from scratch. Alternatively, and the way we’ll detail here, there’s an OTA file, which installs over your current version of Android without wiping your phone.
You can download the beta OTA file from Google’s Full OTA Image hosting site. That site contains OTA downloads for sideloading different updates, including Android 12, on every Pixel and Nexus device, so you’ll need to scroll down to ensure you are downloading the file that associates with your device. OTA downloads are available here.
For the Android 12 Beta, only Google Pixel 3/XL, Pixel 3a/XL, Pixel 4/XL, Pixel 4a, Pixel 4a 5G, and Pixel 5 are available. You won’t be able to install it on the original Pixel/XL or Pixel 2/XL. The same applies for Beta 2.
Next, you’ll boot your Pixel into Recovery mode. To do this, fully power down your handset. Then, hold down on the Power button and the Volume down button at the exact same time until you get to the Bootloader page. You will know you’re in the right place when you see an Android figure lying down on the screen.
Using your volume buttons, scroll down to Recovery mode. Select this by clicking the power button. Alternatively, if you’re already connected to a computer with ADB, you can use the reboot recovery command.
Now, you should see a smaller Android lying down with an exclamation mark over it. From here, press the Power button and the Volume up button for about a second to fully enter Recovery mode. Releasing the Volume up button will send you into Recovery.
Using the volume buttons, scroll down to Apply update from ADB and select it with the power button. This will launch a mostly blank screen with text near the bottom directing you on how to sideload an OTA, such as this one for the Android 12 Beta.
This step is important as it’s the only way to transfer the downloaded OTA file to your handset. You’ll need to have ADB and Fastboot tools in a handy place. You can download ADB tools from the Android Developers website. You can also use the Universal ADB Drivers from ClockWorkMod, which can make the process a bit easier on Windows devices.
As long as everything is in place, you can now sideload the OTA file. On Windows, ensure your Command Prompt is directed to the ADB tools folder and type in adb sideload. If you’re on macOS or Linux, do the same thing in Terminal (use “cd” and “ls” commands to make sure your Terminal is pointed at the right folder, Google it if you need help) but type in ./adb sideload. You’ll then need to insert the file name of the .zip folder you downloaded from Google and hit enter to start the process.
If everything is working properly, you should see some dialog on your computer and handset that shows the process of the sideload and installation process.
Once the OTA is done installing, you will be taken back to Recovery Mode. The last step to jump into the new update is to select the Reboot now option with your power button.
Note: This process won’t wipe your device, but it’s good practice to backup any irreplaceable data in the case something goes wrong.
Author: Ben Schoon
Source: 9TO5Google


