Opening and closing tabs can get real messy real quick, especially if they aren’t organized and kept up with. Fortunately, Google Chrome has a feature that lets you group tabs together, saving a lot of headaches. This guide will take you through exactly how to create tab groups in Google Chrome.
Table of contents
What are tab groups in Google Chrome?
In Google Chrome, you have the ability to collect certain open tabs and stick them in their own group, a tab group. These groups can be organized with a title and color to easily differentiate, depending on your thinking process.
Tab groups aren’t just for users who never like to close a tab; they’re perfect for even the neatest browser users who only have a few tabs open at a time. There isn’t a limit on creating tab groups in Chrome, either. As long as your computer has enough RAM to handle it, it can be done.
How to create tab groups in Google Chrome
Creating and maintaining tab groups are pretty straightforward. All you need is to have at least two tabs open in Google Chrome. Here’s how to create one:
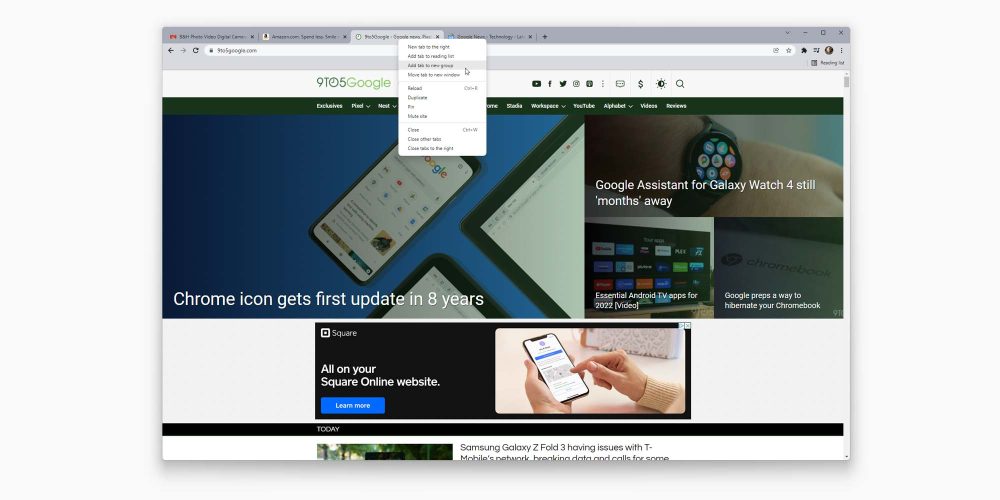
- Right-click any tab in Google Chrome.
- Look for Add tab to a new group and click it.
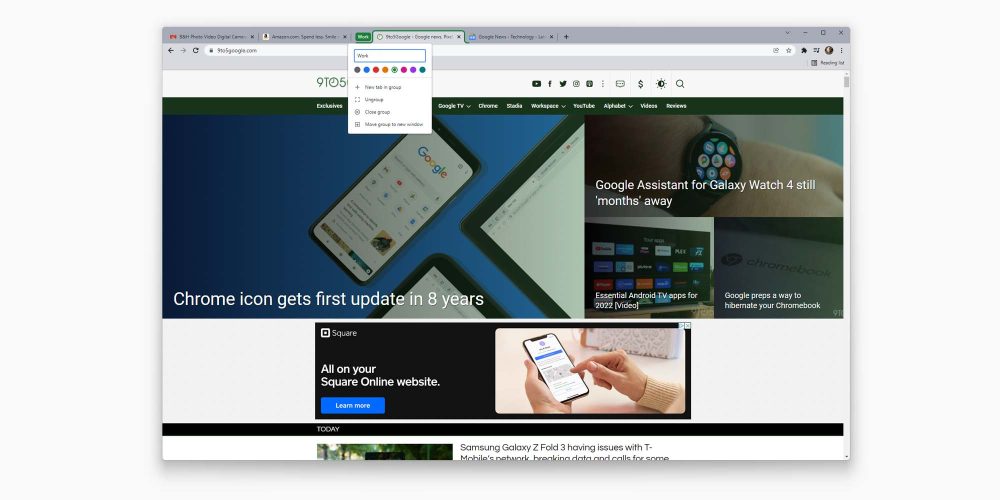
- A pop-up will appear asking you to name the group and choose a color. Go ahead and do so.
- Once you have named and chosen a color for the group, click off of the pop-up or press enter.


How to move tabs between groups
There are a couple of methods to move tabs around, whether you want to remove a tab from a group or add it to a different one. In order to add a tab to a group, simply click and drag the tab into an existing group. When the tab is in the group, you’ll know because the tab border will change colors to reflect its location.
To take a tab out of a group, simply click and drag the tab out of the group and off to the side. The border will disappear and it’ll look like a normal, lonely tab. For both adding and removing tabs from groups, you can also just right-click on the tab and select Remove from group or Add to group and then select the destination.

How to organize your tab groups
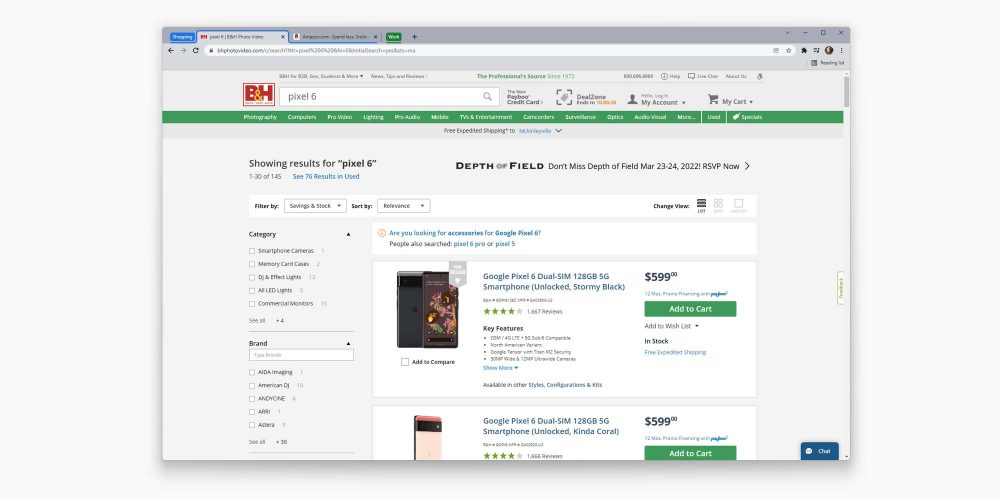
By utilizing tab groups, sectioning up different categories of sites is extremely easy. For instance, say you want to keep all of your online shopping in one section and work documents in Google Drive somewhere else, you don’t need to have multiple windows open, only multiple tab groups. That, plus color coordination can make for a well-organized Chrome experience.
The flexibility that tab groups add to Chrome is genuinely exciting. No one organizes tabs the same exact way, and how Google has developed tab groups showcases that. Personally, I love the rigid structure of tabs named Work, Shopping, and so on; though, that organization technique doesn’t work for everyone. The flexibility in Chrome’s tab groups allows you to name a tab anything you want. You can even use emojis for easier recognition.
Tips and tricks for using tab groups
What makes tab groups great for organizing is the ability to hide the contents of a group at any time. This cleans up space and makes Chrome look a lot neater. All you have to do is simply click the group title and all of the tabs assigned to that group will slide away, out of sight.

Another feature is the ability to perform actions for the whole tab group. By right-clicking the tab group name, you can either add a new tab to the group, ungroup or disband the tab group, close the group and exit all tabs in the group, or move the group to a new window.
For instance, if you have a shopping tab with sites like Amazon and open, you can close the whole group once you’ve placed your orders and are finished with what you were doing. In doing so, you close all the tabs of a similar theme at once. After closing a tab group, you won’t be able to go back to it unless you recreate it, though Google is working on a fix for this.
That being said, you can use tab groups however you want. Organization works differently for everyone. Knowing how to create tab groups in Google Chrome will hopefully enable you to be more productive online.
Author: Andrew Romero
Source: 9TO5Google


